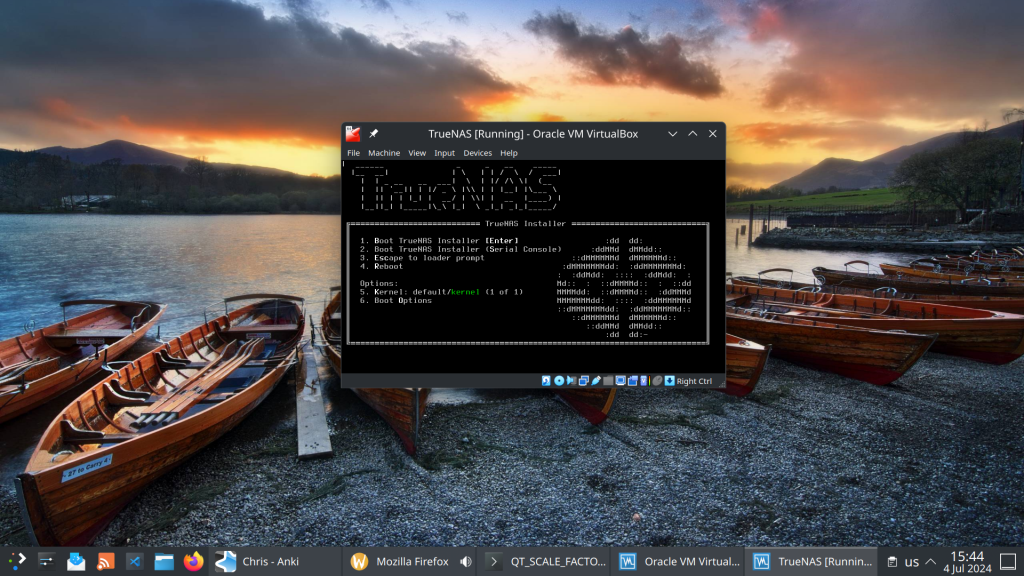
Running TrueNAS in VirtualBox is a great way to test configurations, experiment with ZFS pools, or learn the TrueNAS UI before deploying on real hardware. As of February 2026, the latest stable version is TrueNAS 25.10.2.1 (Goldeye), with TrueNAS 26 beta planned for April 2026.
VM Settings
Type: BSD, FreeBSD (64-bit)
RAM: 8 GB minimum (ZFS needs memory)
CPU: 2+ cores
Disk 1: 16 GB (boot drive)
Disk 2-4: Create additional virtual disks for your ZFS pool (e.g., 3x 20 GB for a RAIDZ1)
Network: Bridged adapter (so TrueNAS gets its own IP on your LAN)
Important VirtualBox Settings
Under System > Processor, make sure to enable PAE/NX. Under System > Acceleration, enable VT-x/AMD-V and Nested Paging.
For the disk controller, use AHCI (not IDE) for better performance and compatibility.
Note: If you’re on an AMD system and get a VERR_SVM_IN_USE error, you may need to unload the KVM modules first — see my post on VirtualBox AMD-V fix.
Once TrueNAS boots, it will display the web UI address on the console. Open it in your browser and create your ZFS pool using the additional virtual disks.
This setup is perfect for testing pool configurations, snapshots, replication, and apps before committing to production hardware.
The latest episode of TrueNAS Tech Talk (T3) — Episode 56 — dropped on March 6, 2026, and it’s packed with news that every TrueNAS homelab enthusiast and sysadmin will want to hear. Hosts Kris Moore and Chris Peredun (the TrueNAS HoneyBadger) cover the upcoming TrueNAS 26 release schedule, a deep dive into the new dataset tiering feature, and tackle eight viewer questions.
TrueNAS 26: A (Tentative!) Release Timeline
The big headline this week is that Kris and Chris finally lay out the tentative roadmap from the first TrueNAS 26 BETA release all the way through to the .0 general availability. If you’ve been waiting to know when you can get your hands on the next generation of TrueNAS software, this episode gives you the clearest picture yet. No more codenames, no more decimal versioning — as the team confirmed back in Ep. 52, TrueNAS is moving to a clean annual release cycle, and 26 is the first major fruit of that shift.
Dataset Tiering: Hybrid Storage Gets Smarter
One of the standout features coming to TrueNAS 26 is dataset tiering — the ability to mix fast flash and spinning-disk pools and automatically tier datasets (or shares) between them. This is an Enterprise-tier feature, meaning it won’t land in the Community Edition, but the architecture is fascinating for anyone interested in how ZFS and TrueNAS manage data placement at scale. Since this is implemented at the TrueNAS layer rather than directly in OpenZFS, pools remain compatible with standard OpenZFS if you ever need to migrate away, though some caveats may apply.
For those of us running pure Community Edition homelabs — Docker stacks, S3-compatible storage, and all — it’s still a great signal of the direction TrueNAS engineering is heading.
Eight Viewer Questions
As always, Kris and Chris close out the episode with a batch of community questions — likely touching on storage configuration, upgrade paths, and follow-up on ZFS AnyRaid and Spotlight search (truesearch) from recent episodes.
Why This Episode Matters for Homelab Users
If you’re self-hosting on TrueNAS Scale — running Docker containers, managing snapshots over Tailscale, or experimenting with S3-compatible backends like RustFS or Garage — TrueNAS 26 is a significant milestone. The annual cadence promises more predictable upgrade windows, and features like dataset tiering give a window into where the platform’s storage smarts are heading.
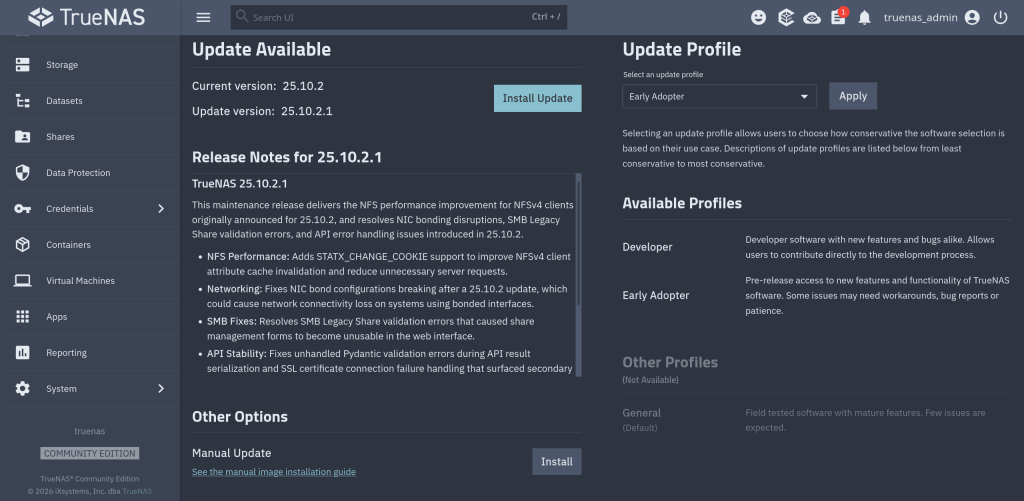
Improves NFS performance for NFSv4 clients (NAS-139128). Adds support for STATX_CHANGE_COOKIE to properly surface ZFS sequence numbers to NFS clients via knfsd. The NFS change_info4 structure now accurately tracks directory and file changes, which reduces unnecessary server requests. Client attribute cache invalidation is also improved. Previously, the system synthesized change IDs based on ctime, which could fail to increment consistently due to kernel timer coarseness.
Fixes NIC bonding configuration disrupted after a system update (NAS-139889). Resolves an issue where network interface bond configurations could break after a TrueNAS 25.10.2 update. Affected systems could lose network connectivity on bonded interfaces.
Fixes SMB Legacy Share validation errors that broke share management UI forms (NAS-139892). Resolves an issue where SMB shares using the Legacy Share preset with certain path_suffix variable substitutions failed middleware validation. The SMB share configuration forms became unusable in the web interface as a result.
Fixes API result serialization failures caused by unhandled validation errors (NAS-139896). Resolves an issue where certain Pydantic validation errors were not caught during API result serialization. This caused unexpected errors to appear in the web interface instead of proper error messages.
Fixes SSL certificate connection failure error handling (NAS-139938). Resolves an AttributeError that occurred when an HTTPS connection failed due to a certificate error. Cloud sync tasks, replication, or other SSL-dependent network operations could surface a secondary AttributeError instead of the original connection failure message.
How the Model Context Protocol turns your NAS into a conversational system
What is MCP?
The Model Context Protocol (MCP) is an open standard developed by Anthropic that allows AI assistants like Claude to connect to external tools, services, and data sources. Think of it as a universal plugin system for AI — instead of copy-pasting terminal output into a chat window, you give the AI a live, structured connection to your systems so it can query and act on them directly.
MCP servers are small programs that speak a standardized JSON-RPC protocol. The AI client (Claude Desktop, Claude Code, etc.) spawns the server process and communicates with it over stdio. The server translates AI requests into real API calls — in this case, against the TrueNAS middleware WebSocket API.
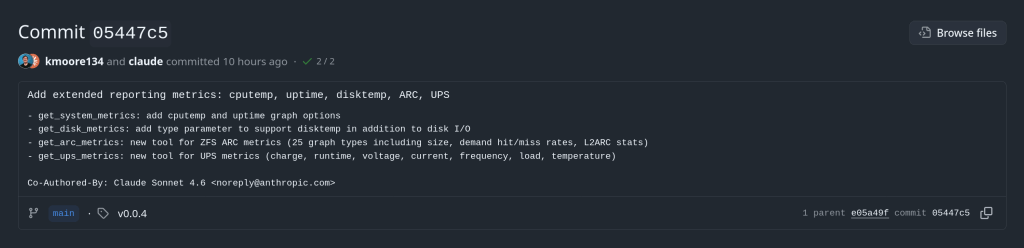
The TrueNAS MCP Connector
TrueNAS Research Labs recently released an official MCP server for TrueNAS systems. It is a single native Go binary that runs on your desktop or workstation, connects to your TrueNAS over an encrypted WebSocket (wss://), authenticates with an API key, and exposes the full TrueNAS middleware API to any MCP-compatible AI client.
Crucially, nothing is installed on the NAS itself. The binary runs entirely on your local machine.
What it can do
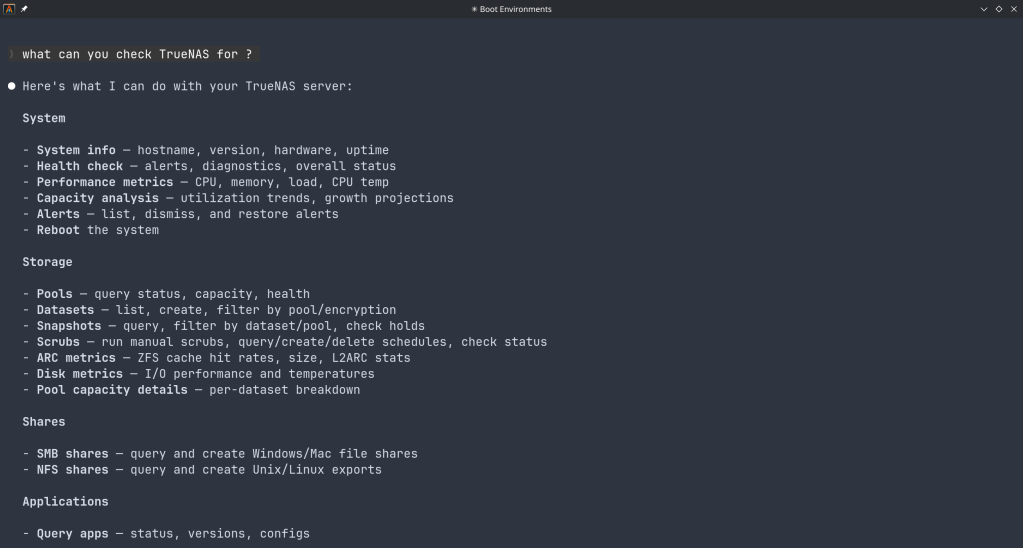
The connector covers essentially the full surface area of TrueNAS management:
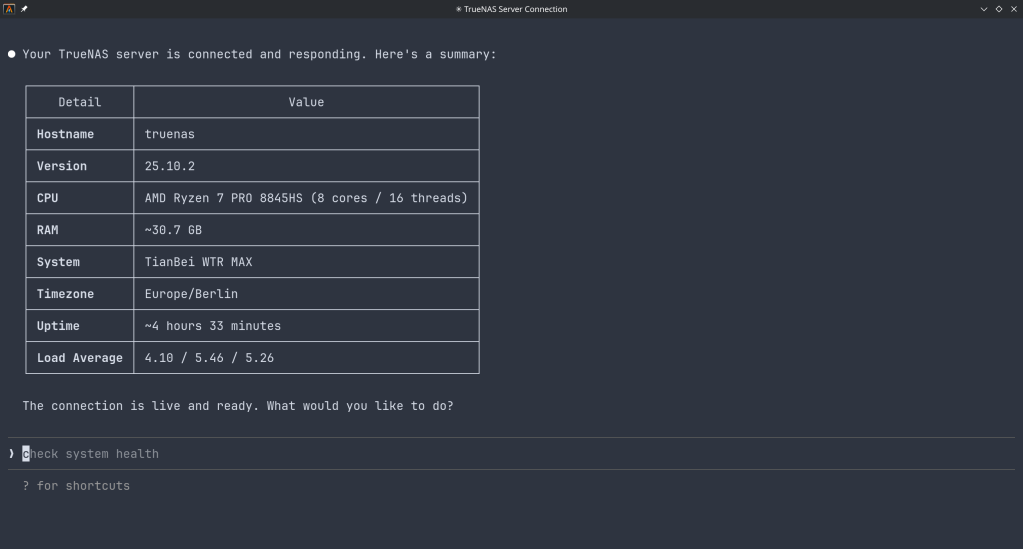
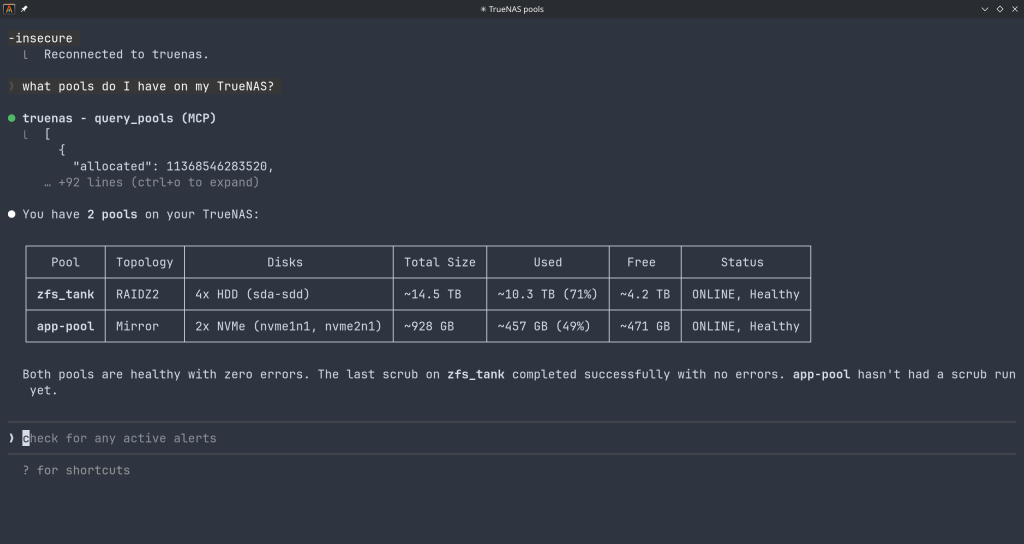
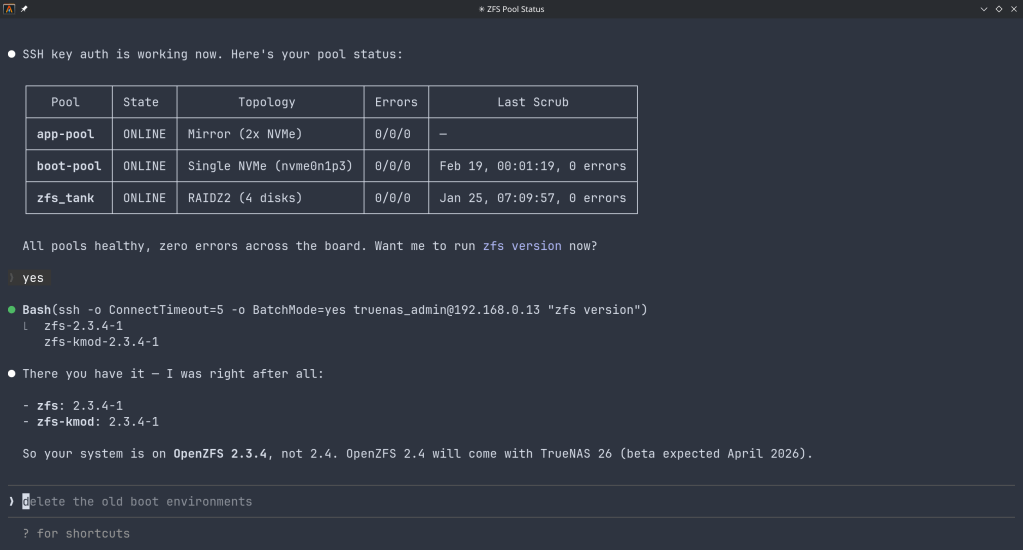
Storage — query pool health, list datasets with utilization, manage snapshots, configure SMB/NFS/iSCSI shares. Ask “which datasets are above 80% quota?” and get a direct answer.
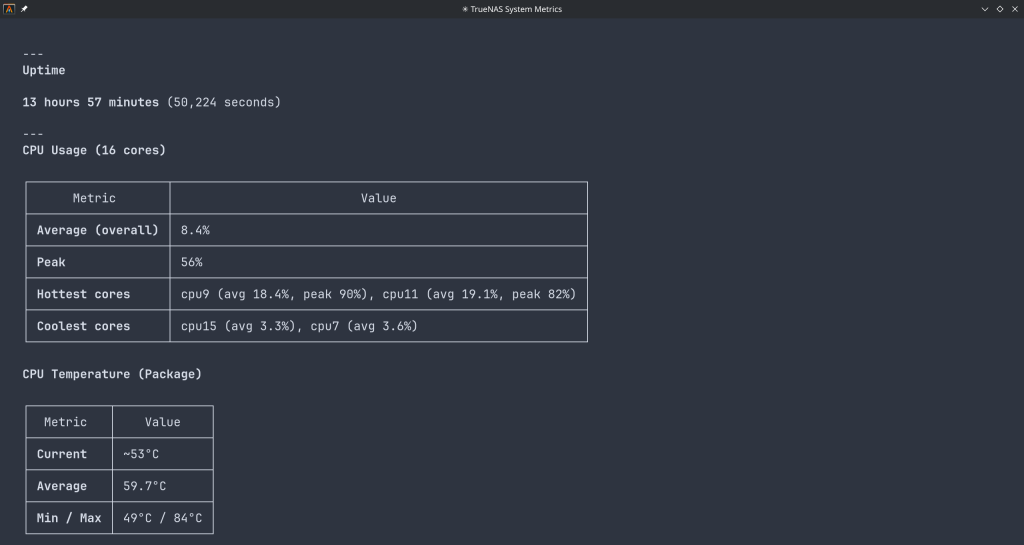
System monitoring — real-time CPU, memory, disk I/O, and network metrics. Active alerts, system version, hardware info. The kind of overview that normally requires clicking through several pages of the web UI.
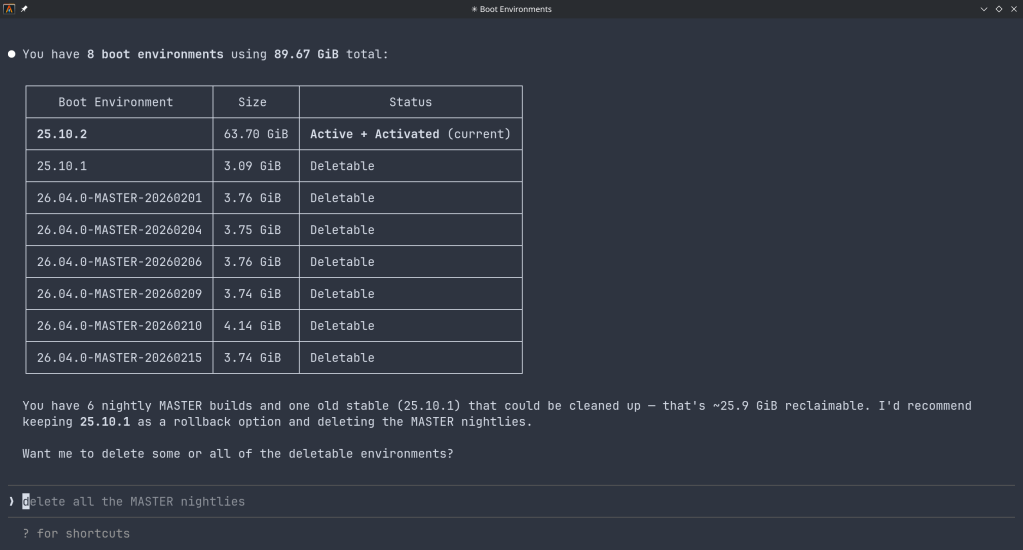
Maintenance — check for available updates, scrub status, boot environment management, last backup timestamps.
Application management — list, install, upgrade, and monitor the status of TrueNAS applications (Docker containers on SCALE).
Virtual machines — full VM lifecycle: create, start, stop, monitor resource usage.
Capacity planning — utilization trends, forecasting, and recommendations. Ask “how long until my main pool is full at current growth rate?” and get a reasoned answer.
Directory services — Active Directory, LDAP, and FreeIPA integration status and management.
Safety features
The connector includes a dry-run mode that previews any destructive operation before executing it, showing estimated execution time and a diff of what would change. Built-in validation blocks dangerous operations automatically. Long-running tasks (scrubs, migrations, upgrades) are tracked in the background with progress updates.
Why This Matters
Traditional NAS management is a context-switching problem. You have a question — “why is this pool degraded?” — and answering it means opening the web UI, navigating to storage, cross-referencing the alert log, checking disk SMART data, and reading documentation. Each step is manual.
With MCP, the AI holds all of that context simultaneously. A single question like “my pool has an error, what should I do?” triggers the AI to query pool status, check SMART data, look at recent alerts, and synthesize a diagnosis — in one response, with no tab-switching.
This is especially powerful for complex homelab setups with many datasets, containers, and services. Instead of maintaining mental models of your storage layout, you can just ask.
Generate an API key in TrueNAS under System Settings → API Keys.
Configure your MCP client — Claude Desktop (~/.config/claude/claude_desktop_config.json) or Claude Code (claude mcp add ...).
Restart the client and start asking questions.
The binary supports self-signed certificates (pass -insecure for typical TrueNAS setups) and works over Tailscale or any network path to your NAS.
Example queries you can use right away
“What is the health status of all my pools?”
“Show me all datasets and their current usage”
“Are there any active alerts I should know about?”
“Which of my containers are not running?”
“Preview creating a new dataset for backups with lz4 compression”
“When was the last scrub on my main pool, and did it find errors?”
“What TrueNAS version am I running and are updates available?”
Current Status
The TrueNAS MCP connector is a research preview (currently v0.0.4). It is functional and comprehensive, but not yet recommended for production-critical automation. It is well-suited for monitoring, querying, and exploratory management. Treat destructive operations (dataset deletion, VM reconfiguration) with the same care you would in the web UI — use dry-run mode first.
The project is open source and actively developed. Given that this is an official TrueNAS Labs project, it is likely to become a supported feature in future TrueNAS releases.
Broader Implications
The TrueNAS MCP connector is an early example of a pattern that will become common: infrastructure that exposes a semantic API layer for AI consumption, not just a REST API for human-written scripts. The difference is significant. A REST API tells you what the data looks like. An MCP server tells the AI what operations are possible, what they mean, and how to chain them safely.
As more homelab and enterprise tools adopt MCP, the practical vision of a conversational infrastructure layer — where you describe intent and the AI handles execution — becomes genuinely achievable, not just a demo.
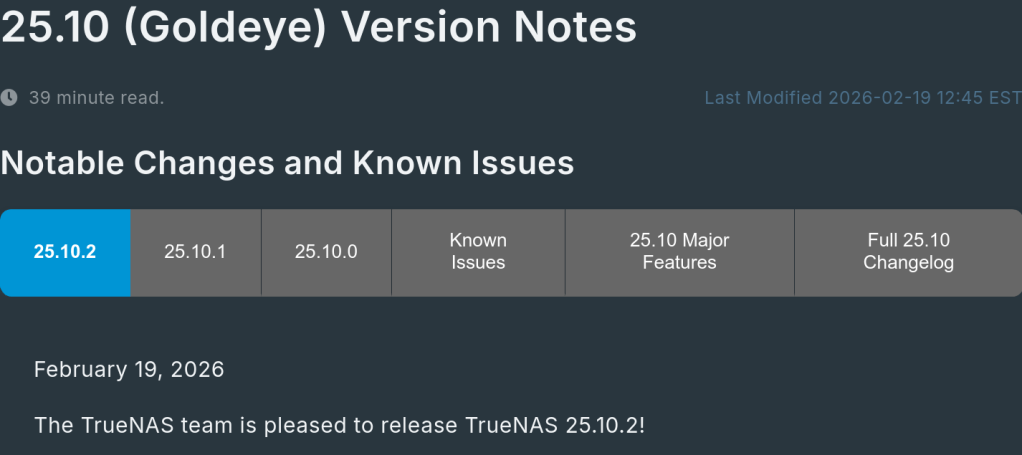
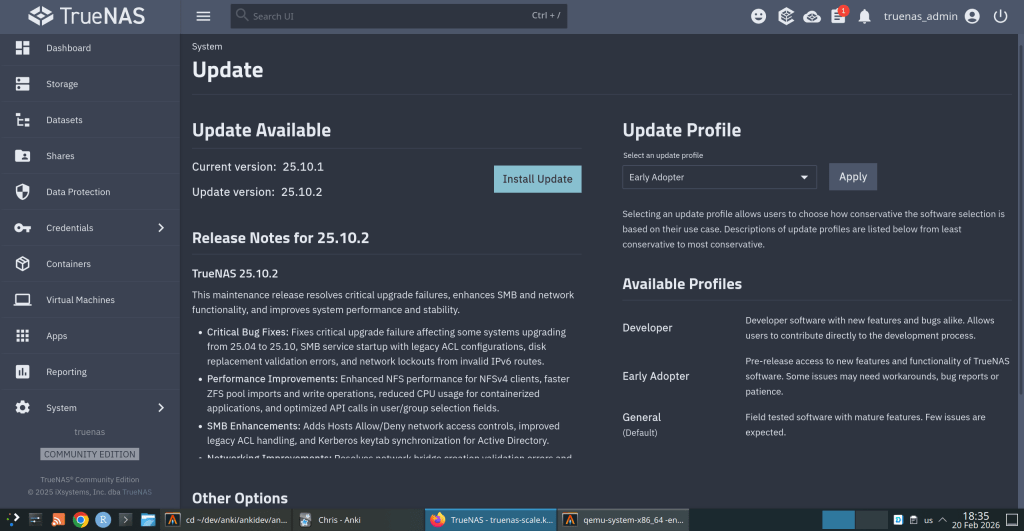
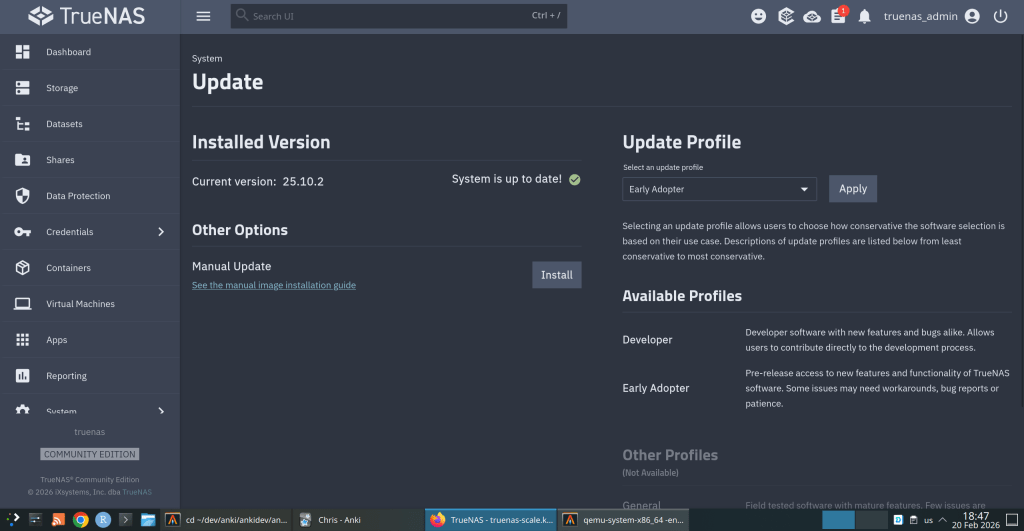
iXsystems has released TrueNAS 25.10.2, a maintenance update to the 25.10 branch. If you’re running TrueNAS Scale on the Early Adopter channel, this is a recommended update — it fixes several critical issues including an upgrade path bug that could leave systems unbootable.
Critical Fixes
Upgrade failure fix (NAS-139541). Some systems upgrading from TrueNAS 25.04 to 25.10 encountered a “No space left on device” error during boot variable preparation, leaving the system unbootable after the failed attempt. This is fixed in 25.10.2.
SMB service startup after upgrade (NAS-139076). Systems with legacy ACL configurations from older TrueNAS versions could not start the SMB service after upgrading to 25.10.1. The update now automatically converts legacy permission formats during service initialization.
Disk replacement validation (NAS-138678). A frustrating bug rejected replacement drives with identical capacity to the failed drive, showing a “device is too small” error. Fixed — identical capacity replacements now work correctly.
Performance Improvements
NFS performance for NFSv4 clients (NAS-139128). Support for STATX_CHANGE_COOKIE has been added, surfacing ZFS sequence numbers to NFS clients via knfsd. Previously, the system synthesized change IDs based on ctime, which could fail to increment consistently due to kernel timer coarseness. This improves client attribute cache invalidation and reduces unnecessary server requests.
ZFS pool import performance (NAS-138879). Async destroy operations — which can run during pool import — now have a time limit per transaction group. Pool imports that previously stalled due to prolonged async destroy operations will complete significantly faster.
Containerized app CPU usage (NAS-139089). Background CPU usage from Docker stats collection and YAML processing has been reduced by optimizing asyncio_loop operations that were holding the Global Interpreter Lock during repeated container inspections.
Networking
Network configuration lockout fix (NAS-139575). Invalid IPv6 route entries in the routing table could block access to network settings, app management, and bug reporting. The system now handles invalid route entries gracefully.
Network bridge creation fix (NAS-139196). Pydantic validation errors were preventing bridge creation through the standard workflow of removing IPs from an interface, creating a bridge, and reassigning those IPs.
IPv6 Kerberos fix (NAS-139734). Active Directory authentication failed when using IPv6 addresses for Kerberos Distribution Centers. IPv6 addresses are now properly formatted with square brackets in krb5.conf.
SMB Hosts Allow/Deny controls (NAS-138814). IP-based access restrictions are now available for SMB shares across all relevant purpose presets. Also adds the ability to synchronize Kerberos keytab SPNs with Active Directory updates.
UI and Cloud
Dashboard storage widget (NAS-138705). Secondary storage pools were showing “Unknown” for used and free space in the Dashboard widget. Fixed.
Cloud Sync tasks invisible after CORE → SCALE upgrade (NAS-138886). Tasks were functional via CLI but invisible in the web UI due to a data inconsistency where the bwlimit field contained empty objects instead of empty arrays.
S3 endpoint validation (NAS-138903). Cloud Sync tasks now validate that S3 endpoints include the required https:// protocol prefix upfront, with a clear error message instead of the unhelpful “Invalid endpoint” response.
Session expiry fix (NAS-138467). Users were being unexpectedly logged out during active operations despite configured session timeout settings. Page refresh (F5) was also triggering the login screen during active sessions. Both are now fixed.
Error notifications showing placeholder text (NAS-139010). Error notifications were displaying “%(err)s Warning” instead of actual error messages.
Users page now shows Directory Services users by default (NAS-139073). Directory Services users now appear in the default view without requiring a manual filter change.
SSH access removal fix (NAS-139130). Clearing the SSH Access option appeared to save successfully but the SSH indicator persisted in the user list. Now properly disabled through the UI.
Certificate management for large DNs (NAS-139056). Certificates with Distinguished Names exceeding 1024 characters — typically those with many Subject Alternative Names — can now be properly imported and managed.
Notable Security Change
The root account’s group membership is now locked to builtin_administrators and cannot be modified through the UI. This prevents accidental removal of privileges that could break scheduled tasks, cloud sync, and cron jobs. To disable root UI access, use the Disable Password option in Credentials → Local Users instead.
Upgrade
Update via System → Update in the web UI, or download from truenas.com. Full release notes and changelog are available at the TrueNAS Documentation Hub.