Tag: FreeBSD
-
“Over 30 years of ‘FreeBSD’ commit activity and contributor growth. Includes daily commit counts and new committer data extracted from the cloned git repository (1993-2026), plus ‘Phabricator’ signup statistics (2013-2026). Contains no personal data – only aggregated counts. Useful for time series analysis, growth modeling, and studying open source community dynamics.”
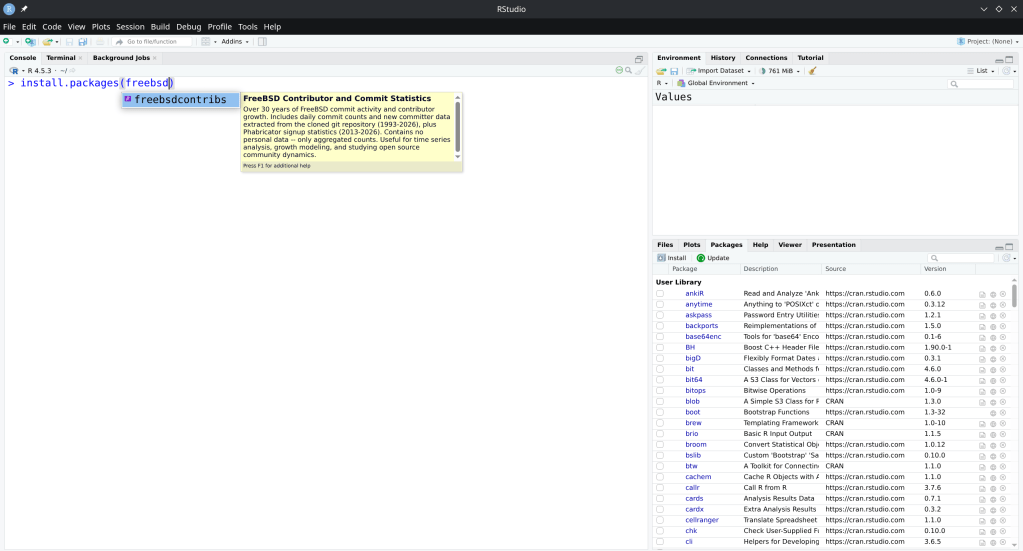
https://cran.r-project.org/web/packages/freebsdcontribs/index.html
-
If you run a FreeBSD VM under QEMU with
-nographicand the terminal goes silent right after the kernel modules load — no login prompt, no panic, just nothing — the VM hasn’t frozen. It booted successfully. The issue is that kernel output is going somewhere you can’t see.This post explains why that happens and how to fix it properly.
The Root Cause
FreeBSD supports two console backends: vidconsole (virtual VGA framebuffer) and comconsole (serial port,
ttyu0). Official VM disk images fromdownload.freebsd.orgdefault tovidconsole— a reasonable choice for hypervisors that expose a graphical display.QEMU’s
-nographicmode suppresses the display window and maps your terminal to the VM’s serial port instead. The problem is the FreeBSD kernel is unaware of this. It continues writing tovidconsole, which effectively goes nowhere in a-nographicsession.The bootloader, however, outputs to both VGA and serial simultaneously. That’s why you see the FreeBSD logo, the boot menu, and the kernel module lines — all of that is bootloader output. The moment the kernel takes control, it drops to
vidconsoleonly, and your terminal goes quiet.The handoff point is visible in the output:
/boot/kernel/zfs.ko size 0x788828 at 0x2795000
/etc/hostid size=0x25
/boot/entropy size=0x1000
Everything after that last line is the kernel running — login prompt included — just on a VGA console you can’t access from a
-nographicsession.
Temporary Fix: Redirect at the Bootloader Prompt
To get through without modifying the image, interrupt autoboot when you see the countdown. Press Space to pause it, then at the loader prompt:
set console="comconsole"
boot
This tells the kernel to route console I/O through the serial port for this boot only. You’ll see full kernel output and get a working login prompt.
Permanent Fix: /boot/loader.conf
Once inside the VM, make the change persistent:
echo 'console="comconsole"' >> /boot/loader.conf
From the next boot onward, the kernel will direct all console output to
ttyu0automatically. No more intercepting the bootloader, no more silent boots. This is the right fix if you’re using this image regularly for development or testing.
Alternative: Skip the Console Entirely, Use SSH
If you don’t need to observe the boot sequence at all, daemonize the VM and access it over SSH:
qemu-system-x86_64 \
    -enable-kvm \
    -m 4G \
    -smp 4 \
    -hda ~/vms/FreeBSD-16.0-CURRENT-amd64-zfs.qcow2 \
    -display none \
    -daemonize \
    -nic user,hostfwd=tcp::2222-:22
Give it roughly 30 seconds to reach multi-user mode, then:
ssh -p 2222 root@localhost
When you’re done:
kill $(pgrep qemu-system)
This approach sidesteps the console issue entirely and works well for quick test sessions where
sshdis already enabled in the image.
Why It’s Easy to Misdiagnose
The bootloader’s dual-output behavior is what makes this particularly deceptive. Because you do get output right up to the kernel handoff, it’s natural to assume something went wrong during kernel initialization — a ZFS import failure, a module panic, something with entropy. In practice, none of that. The system is fully operational, just talking to a VGA display you have no visibility into.
Kernels built with
BOOT_COMCONSOLEin their config, or images specifically targeting headless/serial environments, won’t exhibit this. The stock VM images are built for general-purpose use, so VGA is the sensible default — it just doesn’t play well with-nographicout of the box.
Summary
Goal Solution Fix for one boot Press Space → set console="comconsole"→bootFix permanently echo 'console="comconsole"' >> /boot/loader.confSkip console, SSH only -display none -daemonize+ SSH after ~30sAdding
console="comconsole"to/boot/loader.confis the one-time fix that makes FreeBSD under QEMU behave predictably for all subsequent work. After that,-nographicsessions give you full console output from boot to login with no intervention required. -
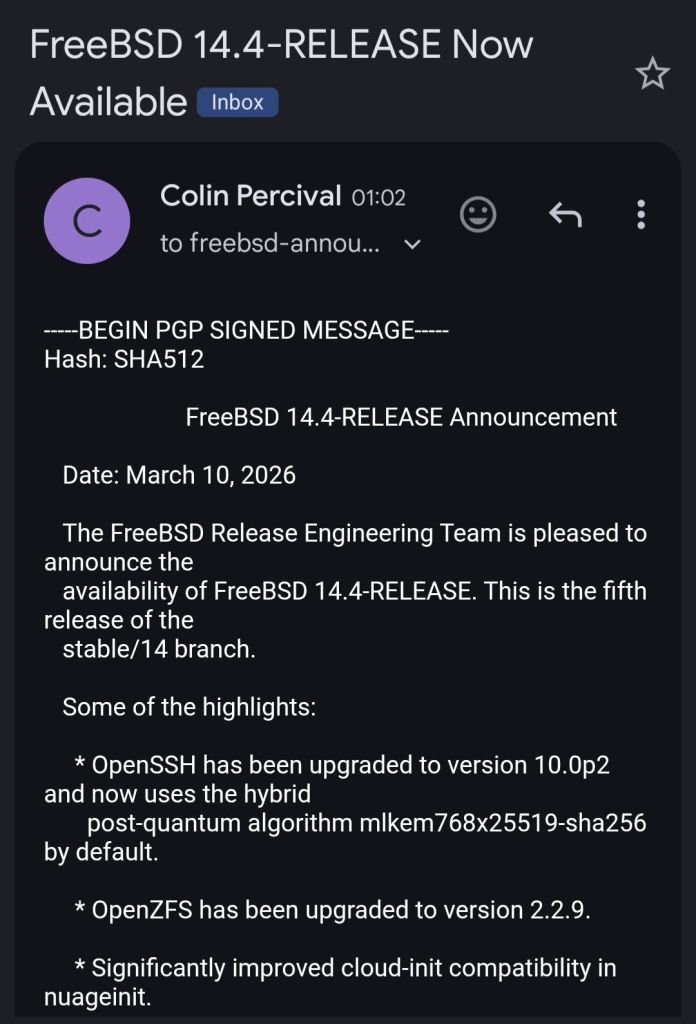
The push for a modern graphical installer in FreeBSD has been ongoing for a while. With FreeBSD 15.0 released in December 2025, many expected it to ship with a graphical installation option — but it didn’t make the cut. The good news: it’s coming in FreeBSD 15.1.
What Happened with 15.0
FreeBSD 15.0 shipped with the traditional
bsdinstalltext-based installer. While functional, it’s showing its age — the text-based dialogs work fine for experienced admins, but they’re a barrier for adoption compared to what Linux distros offer.What’s Coming in 15.1
According to the FreeBSD Q4 2025 status report and the Foundation’s laptop project updates, FreeBSD 15.1 will include:
- KDE Plasma desktop as an installable option during installation
- Testing with Intel, AMD, and NVIDIA GPUs (including a NVIDIA GPU selection menu)
- Generic VESA driver support as a fallback
- Refactored installer code to support the graphical workflow
The Bigger Picture
This is part of the FreeBSD Foundation’s broader laptop usability initiative, which has received over $750,000 in funding throughout 2025 and continues into 2026. The project covers Wi-Fi, graphics drivers, audio, power management, and installation experience.
FreeBSD has always been technically excellent but lagged behind Linux in user-friendliness. A graphical installer with KDE won’t change the OS itself, but it removes one of the biggest friction points for new users. Combined with improvements like PkgBase, s2idle sleep support, and the new SPMC power management driver, FreeBSD is becoming more approachable without sacrificing what makes it great.
For those of us who’ve been installing FreeBSD since the sysinstall days, it’s exciting to see the project evolve while keeping its identity. The FreeBSD 15.1 release schedule is worth keeping an eye on.
-
This is a cautionary tale about how I nearly lost everything on my external SSD because of a moment of carelessness.
What Happened
I wanted to create a bootable USB with Ventoy to run a Linux or FreeBSD ISO. Simple enough — I’ve done it a hundred times. The problem was that I also had my external SSD connected at the same time.
I somehow selected the wrong disk. Instead of formatting the USB stick, I formatted my external SSD. Just like that — all my data was gone.
That sinking feeling when you realize what you’ve done is something I wouldn’t wish on anyone.
Recovery with PhotoRec
Thankfully, I was able to recover most of my data using PhotoRec, a free and open-source data recovery tool (currently at version 7.2, with 7.3 in beta as of January 2026). PhotoRec ignores the filesystem and goes after the underlying data, so it works even after formatting. It can recover over 480 file formats.
Install it (it comes with TestDisk):
# Arch Linux
sudo pacman -S testdisk

# FreeBSD
pkg install testdisk
Run it:
sudo photorec /dev/sdXPhotoRec will scan the disk and recover files into a directory of your choice. It recovered most of my files, though filenames and directory structure were lost — everything gets sorted by file type.
Lessons Learned
- Always double-check the target disk. Run
lsblkbefore any destructive operation. Verify the disk size and partitions match what you expect. Ventoy (currently at v1.1.10) shows disk names and sizes — take the extra second to verify. - Disconnect drives you don’t need. If you’re formatting a USB, unplug your external drives first. It takes 5 seconds and can save you hours of recovery.
- Follow the 3-2-1 backup rule: 3 copies, 2 different media, 1 offsite. If I had a proper backup, the accidental format would have been a minor inconvenience instead of a disaster.
- ZFS snapshots are your friend. On my TrueNAS server, I now run automatic snapshots. Even if something goes wrong, I can roll back instantly.
- Keep PhotoRec/TestDisk installed. You never know when you’ll need it. Better to have it ready than to scramble in a panic.
Don’t be like me. Disconnect your drives, check twice, and back up your data. Your future self will thank you.
- Always double-check the target disk. Run
-
An annoying problem that I always had while running FreeBSD on my Dell Inspiron 15 5510 is the high temperature and fan speed. Doesn’t matter if it’s a live medium or post-installation — the average CPU temp is over 60 degrees Celsius.
With FreeBSD 15.0 (released December 2025) and the FreeBSD Foundation’s laptop project, things have improved significantly. Here’s what works.
Checking CPU Temperature
First, load the Intel Core temperature sensor driver:
kldload -v coretempThen check the temperature with:
sysctl dev.cpu | grep temperatureTo load this automatically at boot, add to
/boot/loader.conf:coretemp_load="YES"Power Management with powerd
FreeBSD ships with
powerd, a daemon that dynamically adjusts CPU frequency based on load. Enable it in/etc/rc.conf:powerd_enable="YES" powerd_flags="-a hiadaptive -b adaptive"This sets the CPU to hiadaptive mode on AC power (favors performance but still scales) and adaptive on battery (favors power saving).
C-States and Power Saving
Enable deeper CPU sleep states by adding to
/etc/sysctl.conf:hw.acpi.cpu.cx_lowest=CmaxNew in FreeBSD 15: Modern Sleep States
FreeBSD 15 brings new power management features from the Foundation’s laptop initiative:
- s2idle (suspend-to-idle) support for modern standby
- New SPMC (System Power Management Controller) driver for s0ix sleep states
- Work-in-progress CPPC (Collaborative Processor Performance Control) for AMD processors — enabling finer-grained performance/efficiency control
Suspend and Resume
For laptops, suspend/resume support can be tested with:
acpiconf -s 3If it works, you can bind it to your laptop lid by adding to
/etc/sysctl.conf:hw.acpi.lid_switch_state=S3Results
After applying these changes, my Dell Inspiron dropped from a constant 60+ degrees down to around 40-45 degrees at idle, and the fan became much quieter. The combination of
powerdwith proper C-state configuration makes a noticeable difference on FreeBSD laptops.More details: coretemp(4), powerd(8), FreeBSD Wiki: Tuning Power Consumption
-
If you’ve ever rebooted a machine and NTP refused to sync because the clock drifted too far, you’ve hit the panic threshold. By default,
ntpdwill exit if the offset exceeds 1000 seconds.The Fix
Add this to
/etc/ntp.conf:tinker panic 0Setting
panic 0disables the panic threshold entirely, allowingntpdto correct any offset regardless of size.When Is This Useful?
- Machines that have been powered off for a long time (e.g., home servers, lab equipment)
- VMs that resume from a suspended state with a stale clock
- Systems without a working RTC battery
- FreeBSD jails or containers that inherit a drifted host clock
Alternative: One-Time Force Sync
If you don’t want to permanently disable the panic threshold, you can do a one-time force sync with:
ntpd -gqThe
-gflag allows the first adjustment to be any size, and-qmakes ntpd set the time and exit. -
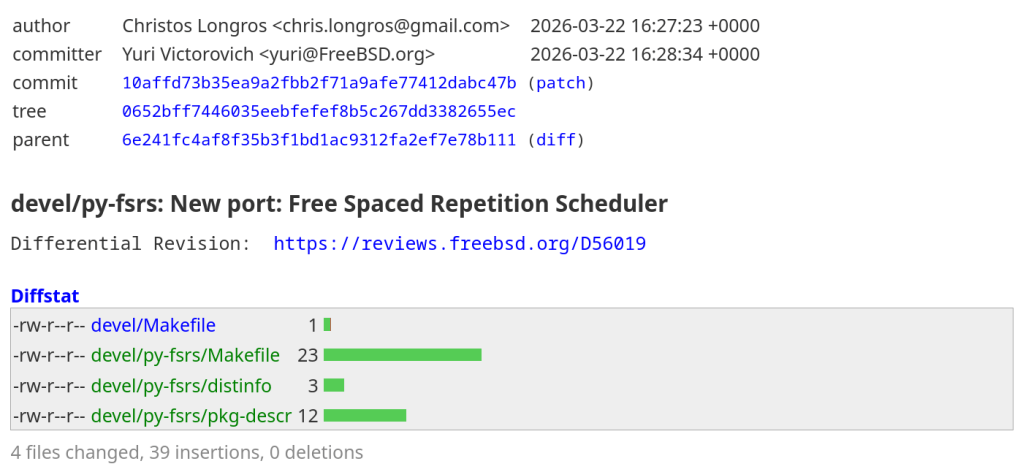
Enabling Silicon Revision Logging in FreeBSD’s rge(4) Driver
This article describes a kernel-level patch to the FreeBSD
rge(4)network driver that enables proper identification of Realtek RTL8125/8126/8127 silicon variants at attach time. The change is small but reveals an interesting idiom gap between two BSD kernels.The rge(4) Driver and Its Hardware
The
rge(4)driver supports a family of Realtek multi-gigabit NICs spanning three product generations. Despite sharing a common PCI device ID tree, each silicon revision has meaningfully different characteristics: different firmware images, different register maps for some functions, and different feature sets.Chip hwrev register Type constant Generation RTL8125 0x60900000 MAC_R25 2.5GbE first gen RTL8125B 0x64100000 MAC_R25B 2.5GbE revised RTL8125D_1 0x68800000 MAC_R25D 2.5GbE third gen RTL8125D_2 0x68900000 MAC_R25D 2.5GbE third gen alt RTL8126_1 0x64900000 MAC_R26 5GbE first gen RTL8126_2 0x64a00000 MAC_R26 5GbE alt RTL8127 0x6c900000 MAC_R27 10GbE The hardware revision is detected by reading the
RGE_TXCFGregister and masking off the lower bits, yielding thehwrevvalue. This happens inrge_get_macaddr()via the attachment path inrge_attach().How Hardware Revision Detection Works
The detection is a straightforward switch statement in
sys/dev/rge/if_rge.c:hwrev = CSR_READ_4(sc, RGE_TXCFG) & RGE_TXCFG_HWREV; switch (hwrev) { case 0x60900000: sc->rge_type = MAC_R25; break; case 0x64100000: sc->rge_type = MAC_R25B; break; /* ... */ }The
rge_typefield stored in the softc structure is then used throughout the driver to select chip-specific paths — for example, firmware loading, ring configuration, and certain register sequences differ between MAC_R25 and MAC_R25B.The Problem: Invisible Chip Identification
Before the patch, despite detecting seven distinct silicon variants at runtime, the driver logged nothing about which one was found. All three product families produce dmesg output that looks like this:
pci0: <network> at device 0.0 (no driver attached)
rge0: <RTL8125> mem 0xfc400000-0xfc40ffff [...] at device 0.0 on pci2
rge0: Using 1 MSI-X message
rge0: CHIP: 0x00000000
miibus0: <MII bus> on rge0
The string
<RTL8125>comes from the PCI probe function — specificallydevice_set_desc()— which is set once during probe based on the PCI subsystem ID, before the hardware revision register is even read. It cannot distinguish RTL8125 from RTL8125B, or RTL8126_1 from RTL8126_2. A user filing a bug report, or a developer debugging an issue specific to one silicon stepping, had no way to confirm which variant was present without writing custom code to readRGE_TXCFGmanually.The OpenBSD Import and the Commented Code
Examining the original import commit reveals that identification prints were always present in the source — just commented out in a non-idiomatic style:
case 0x60900000:
    sc->rge_type = MAC_R25;
// device_printf(dev, "RTL8125\n");
    break;
case 0x64100000:
    sc->rge_type = MAC_R25B;
// device_printf(dev, "RTL8125B\n");
    break;
The use of
//comments is itself a signal: the FreeBSD kernel style guide mandates/* */C89-style comments for all kernel code. The//style is characteristic of code copied directly from another source and then quickly commented out.The origin is OpenBSD’s
sys/dev/pci/if_rge.c, where the equivalent identification uses a different printing idiom:/* OpenBSD style — appends to the in-progress attach line */ case 0x64100000: sc->rge_type = MAC_R25B; printf(": RTL8125B"); break;In OpenBSD, the device attachment infrastructure prints the device name on a line and drivers call bare
printf()to append chip identification to that same line, producing output like:rge0 at pci2 dev 0 function 0 "Realtek 8125" rev 0x00: RTL8125B, ...FreeBSD’s driver framework does not work this way.
device_printf(dev, ...)always begins a new line prefixed with the device name — it cannot append to an existing line. A direct translation of the OpenBSD bareprintf()would either produce garbled output or nothing useful. Rather than translating the idiom at import time, the prints were commented out.The Fix
The correct FreeBSD idiom is
device_printf()on its own line, following attach. The patch enables all seven commented prints in the proper style, and adds the rawhwrevregister value alongside the human-readable name — consistent with how there(4)driver reports chip revisions:switch (hwrev) { case 0x60900000: sc->rge_type = MAC_R25; device_printf(dev, "chip rev: RTL8125 (0x%08x)\n", hwrev); break; case 0x64100000: sc->rge_type = MAC_R25B; device_printf(dev, "chip rev: RTL8125B (0x%08x)\n", hwrev); break; case 0x64900000: sc->rge_type = MAC_R26_1; device_printf(dev, "chip rev: RTL8126_1 (0x%08x)\n", hwrev); break; case 0x64a00000: sc->rge_type = MAC_R26_2; device_printf(dev, "chip rev: RTL8126_2 (0x%08x)\n", hwrev); break; case 0x68800000: sc->rge_type = MAC_R25D; device_printf(dev, "chip rev: RTL8125D_1 (0x%08x)\n", hwrev); break; case 0x68900000: sc->rge_type = MAC_R25D; device_printf(dev, "chip rev: RTL8125D_2 (0x%08x)\n", hwrev); break; case 0x6c900000: sc->rge_type = MAC_R27; device_printf(dev, "chip rev: RTL8127 (0x%08x)\n", hwrev); break; }Including the raw hex value serves two purposes. First, it allows unambiguous identification even if the human-readable label ever becomes incorrect or incomplete. Second, it mirrors the diagnostic value already present in the
CHIP:line printed slightly later in attach, but associates it directly with the revision identification step.Result: Before and After
After the patch, a system with an RTL8125B produces:
rge0: <RTL8125> mem 0xfc400000-0xfc40ffff [...] at device 0.0 on pci2
rge0: chip rev: RTL8125B (0x64100000)
rge0: Using 1 MSI-X message
A system with RTL8126_1 (a 5GbE part that probes as
<RTL8126>) produces:rge0: <RTL8126> mem 0xfc400000-0xfc40ffff [...] at device 0.0 on pci2 rge0: chip rev: RTL8126_1 (0x64900000) rge0: Using 1 MSI-X messageThe chip revision is now permanently captured in
dmesg(8)output and system logs, available without any special tools or kernel knowledge.Why the Raw hwrev Value Matters
The
hwrevbitmask is read from bits [31:20] ofRGE_TXCFG. Realtek does not publish full public documentation for these register fields, and the driver’s variant table has been built incrementally as new silicon steppings were encountered in the wild. Including the raw value means that if a new stepping appears with anhwrevnot yet in the driver’s switch statement, it will still be captured in the log — giving developers the exact value needed to add support for it.Note on the default case: The switch has no explicit default. An unrecognizedhwrevleavesrge_typeat its zero-initialized value. With the patch, the raw value is logged for all handled cases, but an unknown stepping would produce no chip rev line at all — a future improvement could add a default case that logs the unknown value explicitly.Diff Summary
The complete change touches a single file,
sys/dev/rge/if_rge.c:7 lines changed: 7 insertions(+), 7 deletions(-) - // device_printf(dev, "RTL8125\n"); (×7 variants) + device_printf(dev, "chip rev: RTL8125 (0x%08x)\n", hwrev); (×7 variants)No logic changes. No new dependencies. No behavioral differences other than the additional log line per attach.
Review
The patch is under review at reviews.freebsd.org/D55402, where it will be integrated into the broader
rge(4)improvement stack for the upcoming development cycle. -
The rge(4) driver recently landed in FreeBSD HEAD, ported from OpenBSD. I tested it with a physical RTL8125 2.5GbE NIC passed through to a QEMU/KVM virtual machine running FreeBSD 16.0-CURRENT. Here’s what works, what doesn’t, and what’s worth reporting upstream.
Background
The Realtek RTL8125 is one of the most common 2.5 Gigabit Ethernet controllers on consumer motherboards. For years, FreeBSD users had to rely on either the in-tree
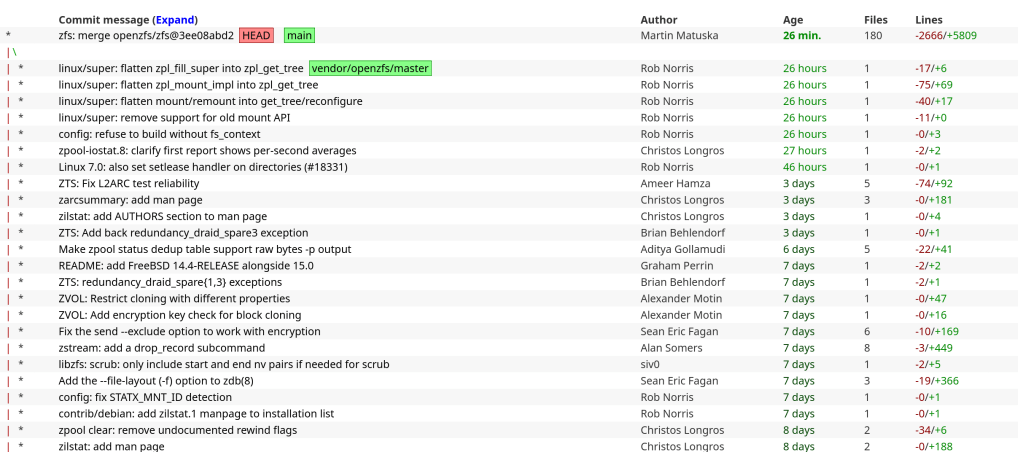
re(4)driver (which didn’t support the RTL8125 at all) or the third-partyrealtek-re-kmodport, which was Realtek’s own driver adapted for FreeBSD but suffered from stability issues and coding standard mismatches with the FreeBSD kernel.In December 2025, Adrian Chadd imported the OpenBSD
rge(4)driver into FreeBSD HEAD. This driver, originally written by Kevin Lo for OpenBSD 6.6, provides native support for the RTL8125, RTL8126, and RTL8127 families. Bernard Spil created thenet/realtek-rge-kmodport for testing on stable branches. The driver is still young on FreeBSD, and the community is actively seeking testing feedback.I have an RTL8125 on my Gigabyte motherboard (Ryzen 7950X system running Arch Linux), so I set out to test the driver using VFIO/PCI passthrough into a FreeBSD 16.0-CURRENT VM.
Test Setup: VFIO Passthrough
The test environment uses PCI passthrough to give the FreeBSD VM direct hardware access to the physical RTL8125 NIC. This is the closest you can get to bare-metal testing without installing FreeBSD directly. The host keeps its network via WiFi (RTL8852CE) while the Ethernet card is handed to the guest.
Arch Linux Host
RTL8852CE (WiFi)→vfio-pci
RTL8125→QEMU/KVM VM
FreeBSD 16-CURRENTStep 1: Identify the NIC and IOMMU group
host$ lspci -nn | grep -i realtek
06:00.0 Network controller: Realtek ... RTL8852CE [10ec:c852]
07:00.0 Ethernet controller: Realtek ... RTL8125 [10ec:8125] (rev 05)

$ find /sys/kernel/iommu_groups/ -type l | sort -V | grep 07:00
/sys/kernel/iommu_groups/16/devices/0000:07:00.0
The RTL8125 sits at PCI address
07:00.0in IOMMU group 16, isolated from other devices. The RTL8852CE WiFi card at06:00.0stays on the host for connectivity.Step 2: Unbind from host and bind to VFIO
host (root)# Load the VFIO PCI module
$ sudo modprobe vfio-pci

# Unbind from the r8169 host driver
$ sudo sh -c 'echo "0000:07:00.0" > /sys/bus/pci/devices/0000:07:00.0/driver/unbind'

# Bind to vfio-pci for passthrough
$ sudo sh -c 'echo "0000:07:00.0" > /sys/bus/pci/drivers/vfio-pci/bind'

# Verify
$ lspci -k -s 07:00.0
07:00.0 Ethernet controller: Realtek ... RTL8125 2.5GbE Controller (rev 05)
        Kernel driver in use: vfio-pci
Step 3: Launch the FreeBSD VM
host$ sudo qemu-system-x86_64 \
    -enable-kvm \
    -m 4G \
    -smp 4 \
    -hda FreeBSD-16.0-CURRENT-amd64-ufs.qcow2 \
    -device vfio-pci,host=07:00.0 \
    -nographic
Note The VM also gets QEMU’s emulatedem0(Intel e1000) by default, which routes through QEMU’s user-mode NAT. Since the default route points toem0, you need to switch it to use the passthrough NIC:route delete default && route add default 192.168.0.1Driver Behavior & Results
FreeBSD detects the RTL8125 immediately on boot and attaches the
rge(4)driver:dmesgrge0: <RTL8125> port 0xc000-0xc0ff mem 0xc000000000-0xc00000ffff, 0xc000010000-0xc000013fff irq 11 at device 4.0 on pci0 rge0: Ethernet address: xx:xx:xx:xx:xx:xx rge0: link state changed to DOWN rge0: link state changed to UPDHCP works, DNS resolves, and the NIC gets a LAN address. Here’s what
pciconfreports:pciconf -lvrge0@pci0:0:4:0: class=0x020000 rev=0x05 vendor=0x10ec device=0x8125 subvendor=0x1458 subdevice=0xe000 vendor = 'Realtek Semiconductor Co., Ltd.' device = 'RTL8125 2.5GbE Controller' class = network subclass = ethernetDriver Statistics
The
sysctl dev.rge.0output shows healthy operation with no concerning errors:Metric Value Status rge_rx_ok26,274 OK rge_tx_ok13,115 OK rge_tx_er6 link negotiation intr_system_errcnt0 OK tx_watchdog_timeout_cnt0 OK transmit_full_cnt0 OK rx_ether_csum_err0 OK link_state_change_cnt2 DOWN → UP Hardware checksum offload for IPv4, TCP, and UDP all function correctly — every
csum_validcounter matches its correspondingcsum_existscounter. Ping latency to external hosts averaged 14–18ms, which is reasonable for the test configuration.Interface capabilities: rge0 vs em0
Comparing the two NICs in the VM reveals a significant gap in advertised features:
Feature em0 (emulated) rge0 (passthrough) RXCSUM / TXCSUM yes yes VLAN_MTU / HWTAGGING yes yes VLAN_HWCSUM yes yes TSO4 yes no LRO yes no Jumbo frames yes no WoL yes no VLAN_HWTSO yes no The
rge(4)driver currently exposes a basic set of offload features (options=9b). TSO, LRO, jumbo frame support, and Wake-on-LAN are not yet implemented, though the OpenBSD man page mentions WoL support.The 2.5G Question
Here’s the most notable finding: the driver does not expose 2500baseT as a media type.
FreeBSD VMroot@freebsd:~# ifconfig rge0 media 2500baseT mediaopt full-duplex
ifconfig: unknown media subtype: 2500baseT

root@freebsd:~# ifconfig rge0
rge0: flags=1008843<UP,BROADCAST,RUNNING,SIMPLEX,MULTICAST,LOWER_UP>
      options=9b<RXCSUM,TXCSUM,VLAN_MTU,VLAN_HWTAGGING,VLAN_HWCSUM>
      media: Ethernet autoselect (1000baseT <full-duplex>)
      status: active
The NIC negotiates at 1000baseT only. This is a known limitation — another user on the FreeBSD forums with an RTL8125BG on an ASRock TRX50 motherboard reported the exact same behavior:
options=9b, 1000baseT, no 2.5G option.OpenBSD comparison The OpenBSDrge(4)man page explicitly documents the RTL8125 as capable of 2500Mbps operation. Since the FreeBSD driver was ported from OpenBSD, the 2.5G media type support may not have been fully adapted to FreeBSD’s ifmedia framework yet, or may require additional work in the FreeBSD-specific parts of the driver.Conclusion & Next Steps
The
rge(4)driver on FreeBSD 16.0-CURRENT works well for basic Ethernet functionality with the RTL8125. The NIC attaches cleanly, DHCP and DNS work, hardware checksum offload is functional, and there are no stability issues during my testing session. For a driver that landed in HEAD just two months ago, this is a solid start.2500baseT media type not available — The hardware is a 2.5GbE controller, but the driver only negotiates at 1G. This is the most impactful limitation for users who specifically chose RTL8125-equipped boards for the faster link speed. I’ve reported this to the FreeBSD freebsd-net mailing list.
Limited offload features — TSO, LRO, jumbo frames, and WoL are not yet exposed. For typical desktop use this is fine, but it will affect throughput in high-bandwidth scenarios.
If you have an RTL8125 and are running FreeBSD 15 or CURRENT, testing the driver and reporting your results — positive or negative — will help get it stabilized and potentially backported to stable branches. The FreeBSD forums thread and the freebsd-current mailing list thread are the best places to contribute.
Reverting passthrough on the host
After shutting down the VM, don’t forget to give the NIC back to your host:
host$ sudo sh -c 'echo "0000:07:00.0" > /sys/bus/pci/drivers/vfio-pci/unbind' $ sudo sh -c 'echo "0000:07:00.0" > /sys/bus/pci/drivers/r8169/bind' $ sudo dhcpcd enp7s0Update:
ifconfig -vm rge0confirms 2500Base-T is listed as a supported media type:supported media:
media autoselect
media 2500Base-T mediaopt full-duplex
media 2500Base-T
media 1000baseT mediaopt full-duplex
media 1000baseT
media 100baseTX mediaopt full-duplex
media 100baseTX
media 10baseT/UTP mediaopt full-duplex
media 10baseT/UTPMy original error was using
2500baseT(lowercase) instead of2500Base-T— the media subtype string is case-sensitive.I also tried forcing 2500Base-T:
ifconfig rge0 media 2500Base-T mediaopt full-duplex
The link briefly dropped and came back at 1000baseT. The media line showed “Ethernet Other ” rather than the expected type. However, I then checked my router and all LAN ports are 1 Gbps only … so the fallback to 1000baseT is expected. I don’t currently have a 2.5G switch to verify actual 2.5G linking.