Tag: ZFS
-
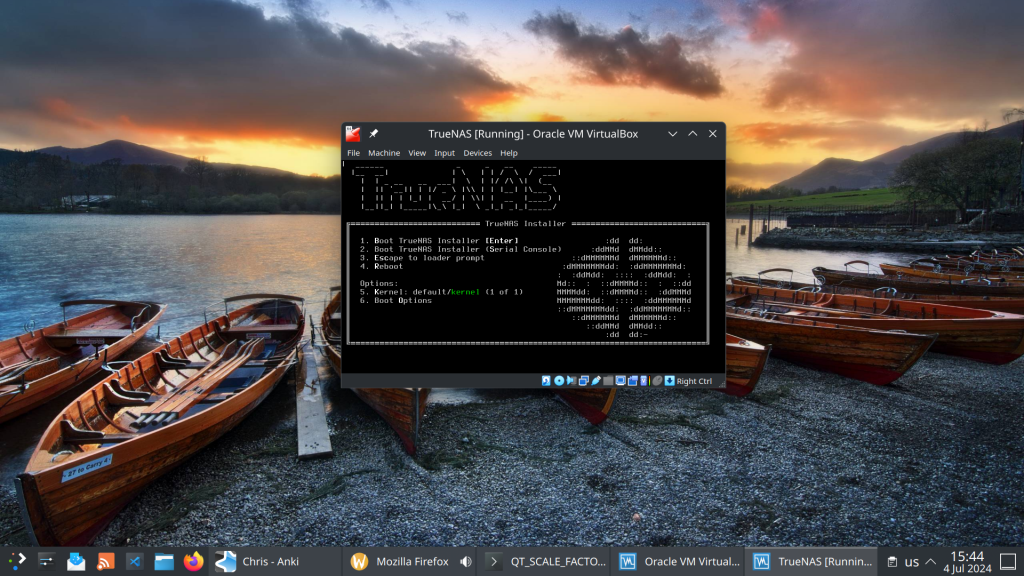
Running TrueNAS in VirtualBox is a great way to test configurations, experiment with ZFS pools, or learn the TrueNAS UI before deploying on real hardware. As of February 2026, the latest stable version is TrueNAS 25.10.2.1 (Goldeye), with TrueNAS 26 beta planned for April 2026.
VM Settings
- Type: BSD, FreeBSD (64-bit)
- RAM: 8 GB minimum (ZFS needs memory)
- CPU: 2+ cores
- Disk 1: 16 GB (boot drive)
- Disk 2-4: Create additional virtual disks for your ZFS pool (e.g., 3x 20 GB for a RAIDZ1)
- Network: Bridged adapter (so TrueNAS gets its own IP on your LAN)
Important VirtualBox Settings
Under System > Processor, make sure to enable PAE/NX. Under System > Acceleration, enable VT-x/AMD-V and Nested Paging.
For the disk controller, use AHCI (not IDE) for better performance and compatibility.
Note: If you’re on an AMD system and get a VERR_SVM_IN_USE error, you may need to unload the KVM modules first — see my post on VirtualBox AMD-V fix.
Installation
- Download the TrueNAS 25.10 ISO from truenas.com
- Mount the ISO in VirtualBox’s optical drive
- Boot the VM and follow the installer
- Install to the 16 GB boot disk
- Remove the ISO and reboot
After Installation
Once TrueNAS boots, it will display the web UI address on the console. Open it in your browser and create your ZFS pool using the additional virtual disks.
This setup is perfect for testing pool configurations, snapshots, replication, and apps before committing to production hardware.
-
The latest episode of TrueNAS Tech Talk (T3) — Episode 56 — dropped on March 6, 2026, and it’s packed with news that every TrueNAS homelab enthusiast and sysadmin will want to hear. Hosts Kris Moore and Chris Peredun (the TrueNAS HoneyBadger) cover the upcoming TrueNAS 26 release schedule, a deep dive into the new dataset tiering feature, and tackle eight viewer questions.
TrueNAS 26: A (Tentative!) Release Timeline
The big headline this week is that Kris and Chris finally lay out the tentative roadmap from the first TrueNAS 26 BETA release all the way through to the .0 general availability. If you’ve been waiting to know when you can get your hands on the next generation of TrueNAS software, this episode gives you the clearest picture yet. No more codenames, no more decimal versioning — as the team confirmed back in Ep. 52, TrueNAS is moving to a clean annual release cycle, and 26 is the first major fruit of that shift.
Dataset Tiering: Hybrid Storage Gets Smarter
One of the standout features coming to TrueNAS 26 is dataset tiering — the ability to mix fast flash and spinning-disk pools and automatically tier datasets (or shares) between them. This is an Enterprise-tier feature, meaning it won’t land in the Community Edition, but the architecture is fascinating for anyone interested in how ZFS and TrueNAS manage data placement at scale. Since this is implemented at the TrueNAS layer rather than directly in OpenZFS, pools remain compatible with standard OpenZFS if you ever need to migrate away, though some caveats may apply.
For those of us running pure Community Edition homelabs — Docker stacks, S3-compatible storage, and all — it’s still a great signal of the direction TrueNAS engineering is heading.
Eight Viewer Questions
As always, Kris and Chris close out the episode with a batch of community questions — likely touching on storage configuration, upgrade paths, and follow-up on ZFS AnyRaid and Spotlight search (truesearch) from recent episodes.
Why This Episode Matters for Homelab Users
If you’re self-hosting on TrueNAS Scale — running Docker containers, managing snapshots over Tailscale, or experimenting with S3-compatible backends like RustFS or Garage — TrueNAS 26 is a significant milestone. The annual cadence promises more predictable upgrade windows, and features like dataset tiering give a window into where the platform’s storage smarts are heading.
Watch the full episode on the TrueNAS blog or on YouTube.
T3 Tech Talk is a weekly podcast from the TrueNAS team. New episodes drop every Thursday.
So …
- Beta 1 at the end of March
- Beta 2 at the end of May
- RC in July
- Official release in September
-
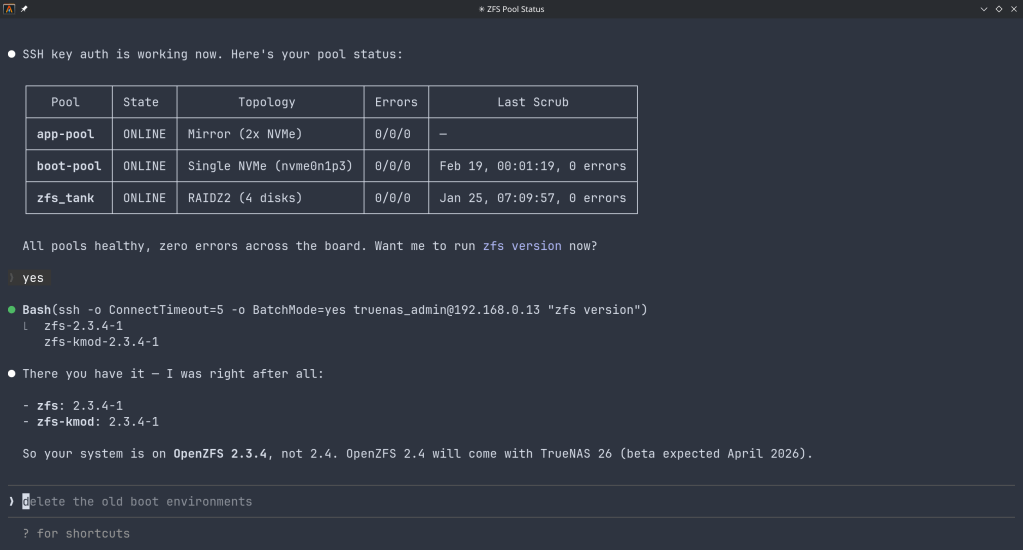
Here’s a scenario most ZFS users have run into at least once. You reboot your server, maybe a drive didn’t spin up in time, or mdadm grabbed a partition before ZFS could — and
zpool importhits you with this:The pool metadata is corrupted.
Action: Destroy and re-create the pool.Your stomach drops. Corrupted? You start mentally cataloging your backups. Maybe you even reach for
zpool destroy.Except… the metadata isn’t corrupted. ZFS just couldn’t see all the disks. The data is fine. The pool is fine. The error message is the problem.
I’ve hit this myself on my TrueNAS box when a drive temporarily disappeared after a reboot. The first time I saw it I genuinely panicked. After digging into the source code, I realized that
ZPOOL_STATUS_CORRUPT_POOLis basically a catch-all. Anytime the root vdev gets tagged withVDEV_AUX_CORRUPT_DATA— whether from actual corruption or simply missing devices — you get the same scary message. No distinction whatsoever.This has been a known issue since 2018. Seven years. Plenty of people complained about it, but nobody got around to fixing it.
So I did. The PR is pretty straightforward — it touches four user-facing strings across the import and status display code paths. The core change:
Before
“The pool metadata is corrupted.”
→ Destroy and re-create the pool.After
“The pool metadata is incomplete or corrupted.”
→ Check that all devices are present first.The recovery message also changed. Instead of jumping straight to “destroy the pool”, it now tells you to make sure your devices aren’t claimed by another subsystem (mdadm, LVM, etc.) and try the import again. You know, the thing you should actually try first before nuking your data.
Brian Behlendorf reviewed it, said it should’ve been cleaned up ages ago, and merged it into master today. Not a glamorous contribution — no new features, no performance gains, just four strings. But if it saves even one person from destroying a perfectly healthy pool because of a misleading error message, that’s a win.
PR: openzfs/zfs#18251 — closes #8236
-
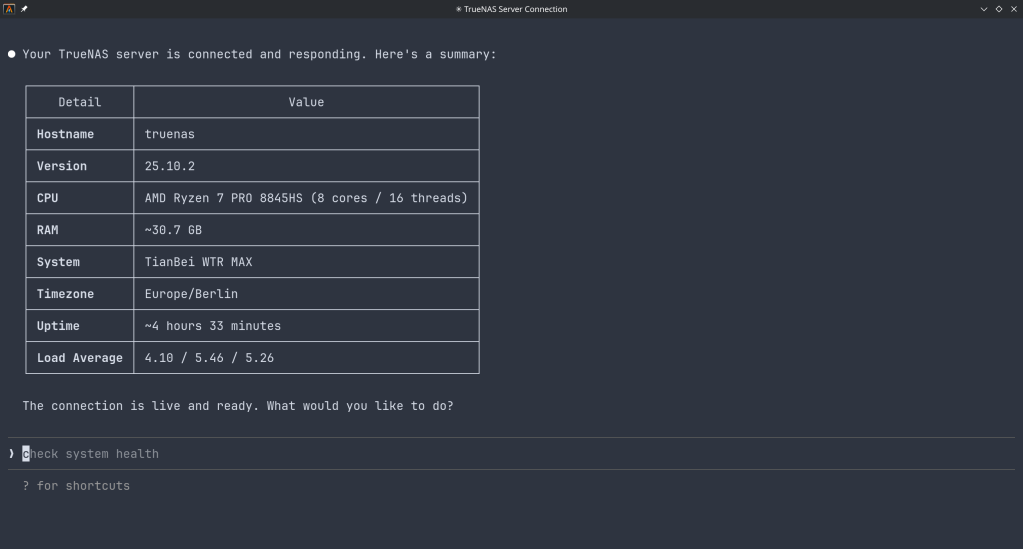
How the Model Context Protocol turns your NAS into a conversational system
What is MCP?
The Model Context Protocol (MCP) is an open standard developed by Anthropic that allows AI assistants like Claude to connect to external tools, services, and data sources. Think of it as a universal plugin system for AI — instead of copy-pasting terminal output into a chat window, you give the AI a live, structured connection to your systems so it can query and act on them directly.
MCP servers are small programs that speak a standardized JSON-RPC protocol. The AI client (Claude Desktop, Claude Code, etc.) spawns the server process and communicates with it over stdio. The server translates AI requests into real API calls — in this case, against the TrueNAS middleware WebSocket API.
The TrueNAS MCP Connector
TrueNAS Research Labs recently released an official MCP server for TrueNAS systems. It is a single native Go binary that runs on your desktop or workstation, connects to your TrueNAS over an encrypted WebSocket (
wss://), authenticates with an API key, and exposes the full TrueNAS middleware API to any MCP-compatible AI client.Crucially, nothing is installed on the NAS itself. The binary runs entirely on your local machine.
What it can do
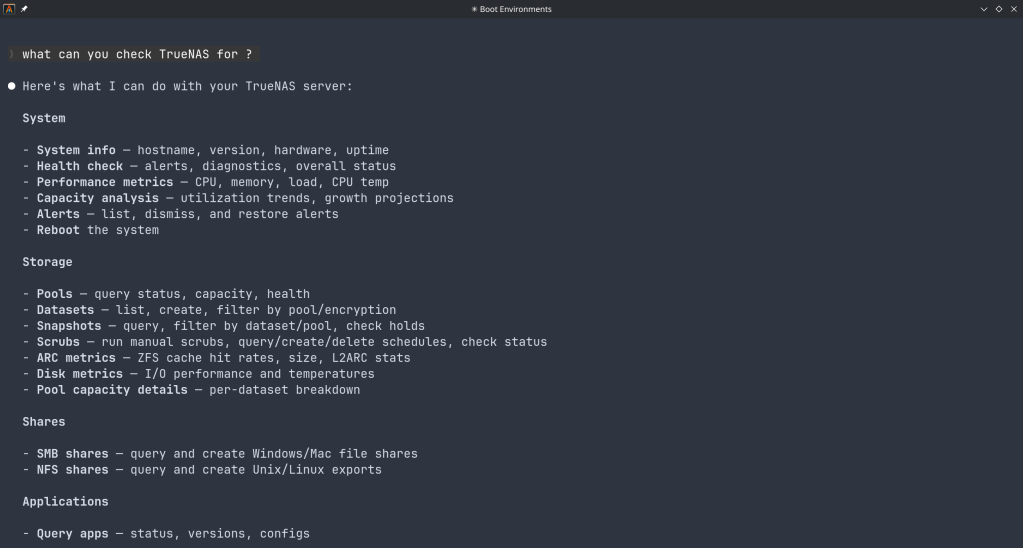
The connector covers essentially the full surface area of TrueNAS management:
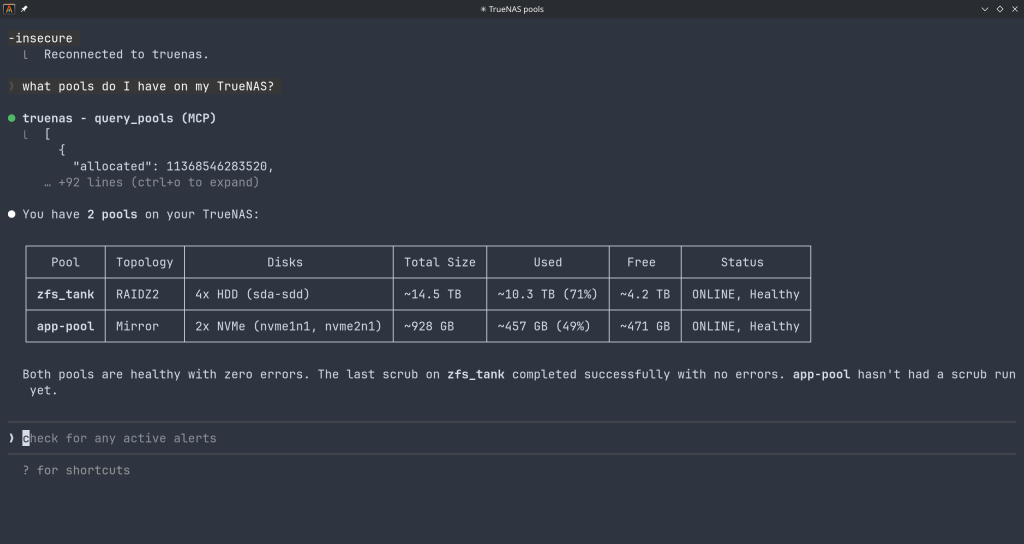
Storage — query pool health, list datasets with utilization, manage snapshots, configure SMB/NFS/iSCSI shares. Ask “which datasets are above 80% quota?” and get a direct answer.
System monitoring — real-time CPU, memory, disk I/O, and network metrics. Active alerts, system version, hardware info. The kind of overview that normally requires clicking through several pages of the web UI.
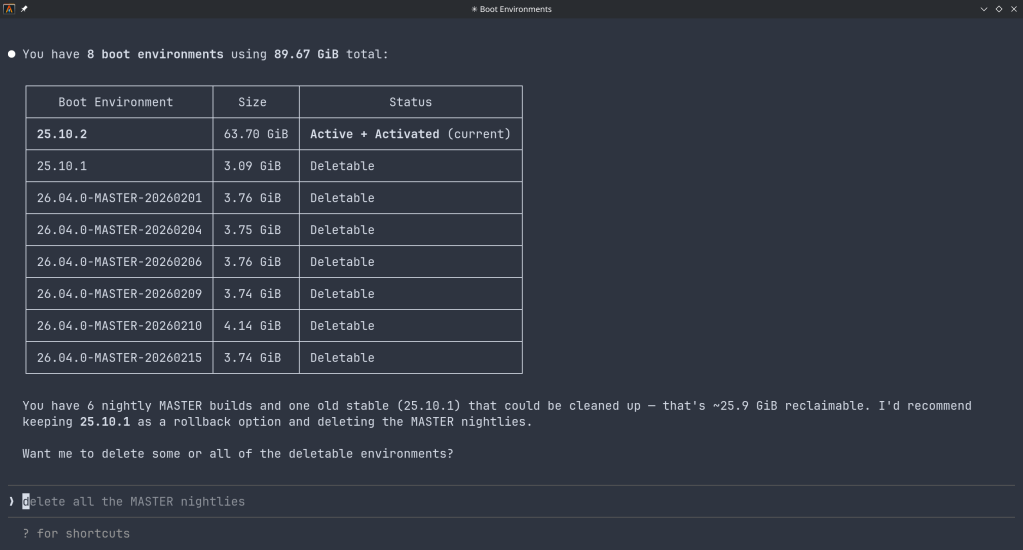
Maintenance — check for available updates, scrub status, boot environment management, last backup timestamps.
Application management — list, install, upgrade, and monitor the status of TrueNAS applications (Docker containers on SCALE).
Virtual machines — full VM lifecycle: create, start, stop, monitor resource usage.
Capacity planning — utilization trends, forecasting, and recommendations. Ask “how long until my main pool is full at current growth rate?” and get a reasoned answer.
Directory services — Active Directory, LDAP, and FreeIPA integration status and management.
Safety features
The connector includes a dry-run mode that previews any destructive operation before executing it, showing estimated execution time and a diff of what would change. Built-in validation blocks dangerous operations automatically. Long-running tasks (scrubs, migrations, upgrades) are tracked in the background with progress updates.
Why This Matters
Traditional NAS management is a context-switching problem. You have a question — “why is this pool degraded?” — and answering it means opening the web UI, navigating to storage, cross-referencing the alert log, checking disk SMART data, and reading documentation. Each step is manual.
With MCP, the AI holds all of that context simultaneously. A single question like “my pool has an error, what should I do?” triggers the AI to query pool status, check SMART data, look at recent alerts, and synthesize a diagnosis — in one response, with no tab-switching.
This is especially powerful for complex homelab setups with many datasets, containers, and services. Instead of maintaining mental models of your storage layout, you can just ask.
Getting Started
The setup takes about five minutes:
- Download the binary from the GitHub releases page and place it in your PATH.
- Generate an API key in TrueNAS under System Settings → API Keys.
- Configure your MCP client — Claude Desktop (
~/.config/claude/claude_desktop_config.json) or Claude Code (claude mcp add ...). - Restart the client and start asking questions.
The binary supports self-signed certificates (pass
-insecurefor typical TrueNAS setups) and works over Tailscale or any network path to your NAS.Example queries you can use right away
- “What is the health status of all my pools?”
- “Show me all datasets and their current usage”
- “Are there any active alerts I should know about?”
- “Which of my containers are not running?”
- “Preview creating a new dataset for backups with lz4 compression”
- “When was the last scrub on my main pool, and did it find errors?”
- “What TrueNAS version am I running and are updates available?”
Current Status
The TrueNAS MCP connector is a research preview (currently v0.0.4). It is functional and comprehensive, but not yet recommended for production-critical automation. It is well-suited for monitoring, querying, and exploratory management. Treat destructive operations (dataset deletion, VM reconfiguration) with the same care you would in the web UI — use dry-run mode first.
The project is open source and actively developed. Given that this is an official TrueNAS Labs project, it is likely to become a supported feature in future TrueNAS releases.
Broader Implications
The TrueNAS MCP connector is an early example of a pattern that will become common: infrastructure that exposes a semantic API layer for AI consumption, not just a REST API for human-written scripts. The difference is significant. A REST API tells you what the data looks like. An MCP server tells the AI what operations are possible, what they mean, and how to chain them safely.
As more homelab and enterprise tools adopt MCP, the practical vision of a conversational infrastructure layer — where you describe intent and the AI handles execution — becomes genuinely achievable, not just a demo.
The TrueNAS MCP connector is available at github.com/truenas/truenas-mcp. Setup documentation is at the TrueNAS Research Labs page.
Sample screenshots!!
-
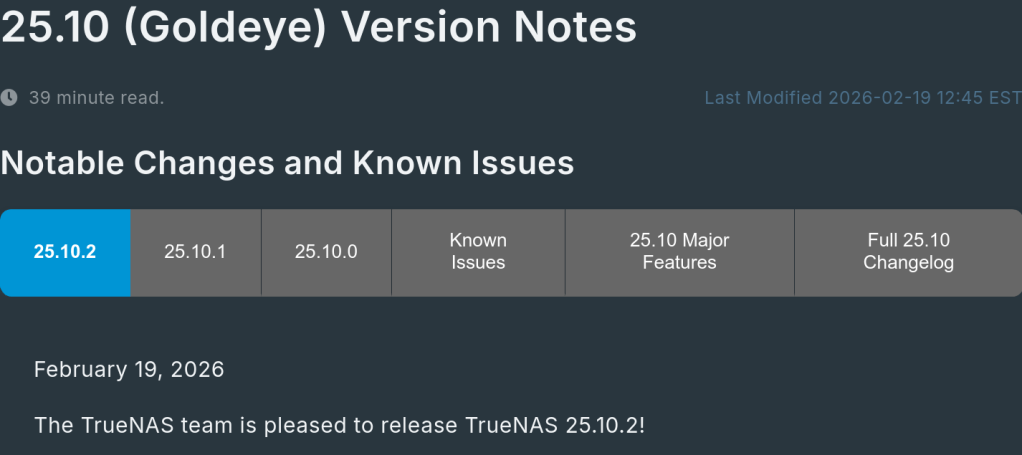
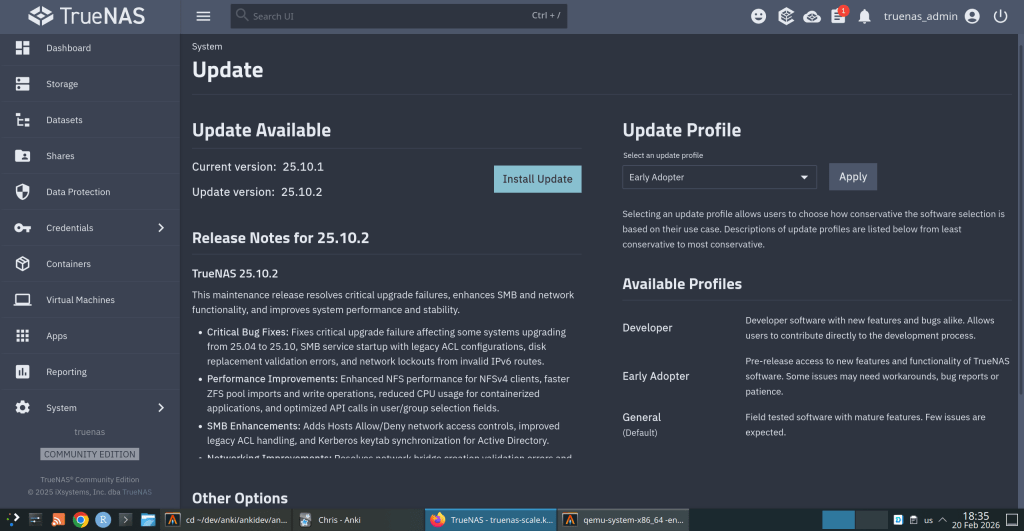
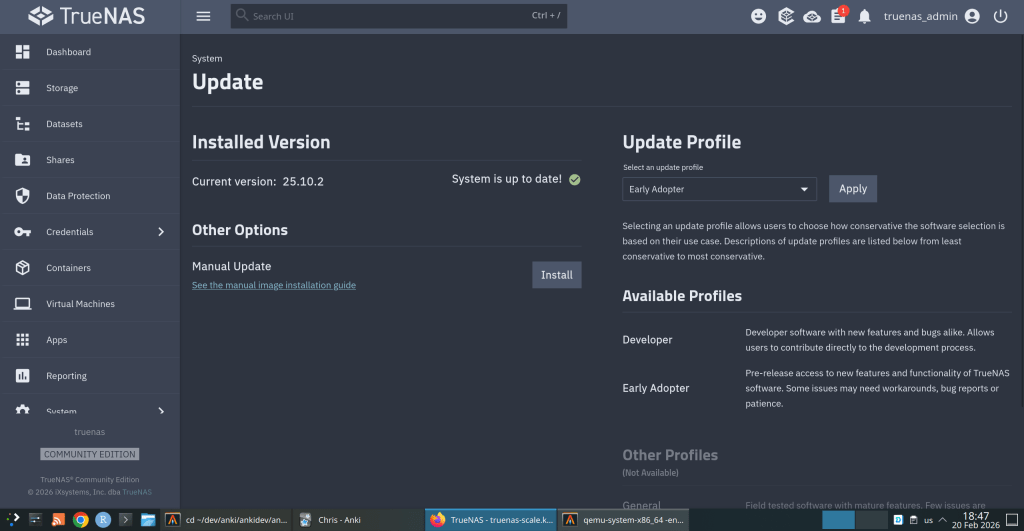
TrueNAS 25.10.2 Released: What’s New
iXsystems has released TrueNAS 25.10.2, a maintenance update to the 25.10 branch. If you’re running TrueNAS Scale on the Early Adopter channel, this is a recommended update — it fixes several critical issues including an upgrade path bug that could leave systems unbootable.
Critical Fixes
Upgrade failure fix (NAS-139541). Some systems upgrading from TrueNAS 25.04 to 25.10 encountered a “No space left on device” error during boot variable preparation, leaving the system unbootable after the failed attempt. This is fixed in 25.10.2.
SMB service startup after upgrade (NAS-139076). Systems with legacy ACL configurations from older TrueNAS versions could not start the SMB service after upgrading to 25.10.1. The update now automatically converts legacy permission formats during service initialization.
Disk replacement validation (NAS-138678). A frustrating bug rejected replacement drives with identical capacity to the failed drive, showing a “device is too small” error. Fixed — identical capacity replacements now work correctly.
Performance Improvements
NFS performance for NFSv4 clients (NAS-139128). Support for
STATX_CHANGE_COOKIEhas been added, surfacing ZFS sequence numbers to NFS clients via knfsd. Previously, the system synthesized change IDs based on ctime, which could fail to increment consistently due to kernel timer coarseness. This improves client attribute cache invalidation and reduces unnecessary server requests.ZFS pool import performance (NAS-138879). Async destroy operations — which can run during pool import — now have a time limit per transaction group. Pool imports that previously stalled due to prolonged async destroy operations will complete significantly faster.
Containerized app CPU usage (NAS-139089). Background CPU usage from Docker stats collection and YAML processing has been reduced by optimizing asyncio_loop operations that were holding the Global Interpreter Lock during repeated container inspections.
Networking
Network configuration lockout fix (NAS-139575). Invalid IPv6 route entries in the routing table could block access to network settings, app management, and bug reporting. The system now handles invalid route entries gracefully.
Network bridge creation fix (NAS-139196). Pydantic validation errors were preventing bridge creation through the standard workflow of removing IPs from an interface, creating a bridge, and reassigning those IPs.
IPv6 Kerberos fix (NAS-139734). Active Directory authentication failed when using IPv6 addresses for Kerberos Distribution Centers. IPv6 addresses are now properly formatted with square brackets in
krb5.conf.SMB Hosts Allow/Deny controls (NAS-138814). IP-based access restrictions are now available for SMB shares across all relevant purpose presets. Also adds the ability to synchronize Kerberos keytab SPNs with Active Directory updates.
UI and Cloud
Dashboard storage widget (NAS-138705). Secondary storage pools were showing “Unknown” for used and free space in the Dashboard widget. Fixed.
Cloud Sync tasks invisible after CORE → SCALE upgrade (NAS-138886). Tasks were functional via CLI but invisible in the web UI due to a data inconsistency where the
bwlimitfield contained empty objects instead of empty arrays.S3 endpoint validation (NAS-138903). Cloud Sync tasks now validate that S3 endpoints include the required
https://protocol prefix upfront, with a clear error message instead of the unhelpful “Invalid endpoint” response.Session expiry fix (NAS-138467). Users were being unexpectedly logged out during active operations despite configured session timeout settings. Page refresh (F5) was also triggering the login screen during active sessions. Both are now fixed.
Error notifications showing placeholder text (NAS-139010). Error notifications were displaying “%(err)s Warning” instead of actual error messages.
Users page now shows Directory Services users by default (NAS-139073). Directory Services users now appear in the default view without requiring a manual filter change.
SSH access removal fix (NAS-139130). Clearing the SSH Access option appeared to save successfully but the SSH indicator persisted in the user list. Now properly disabled through the UI.
Certificate management for large DNs (NAS-139056). Certificates with Distinguished Names exceeding 1024 characters — typically those with many Subject Alternative Names — can now be properly imported and managed.
Notable Security Change
The root account’s group membership is now locked to
builtin_administratorsand cannot be modified through the UI. This prevents accidental removal of privileges that could break scheduled tasks, cloud sync, and cron jobs. To disable root UI access, use the Disable Password option in Credentials → Local Users instead.Upgrade
Update via System → Update in the web UI, or download from truenas.com. Full release notes and changelog are available at the TrueNAS Documentation Hub.
https://forums.truenas.com/t/truenas-25-10-2-is-now-available/63778
-
How a failed nightly update left my TrueNAS server booting into an empty filesystem — and the two bugs responsible.
I run TrueNAS Scale on an Aoostar WTR Max as my homelab server, with dozens of Docker containers for everything from Immich to Jellyfin. I like to stay on the nightly builds to get early access to new features and contribute bug reports when things go wrong. Today, things went very wrong.
The Update Failure
It started innocently enough. I kicked off the nightly update from the TrueNAS UI, updating from
26.04.0-MASTER-20260210-020233to the latest20260213build. Instead of a smooth update, I got this:error
[EFAULT] Error: Command ['zfs', 'destroy', '-r', 'boot-pool/ROOT/26.04.0-MASTER-20260213-020146-1'] failed with exit code 1: cannot unmount '/tmp/tmpo8dbr91e': pool or dataset is busyThe update process was trying to clean up a previous boot environment but couldn’t unmount a temporary directory it had created. No big deal, I thought — I’ll just clean it up manually.
Down the Rabbit Hole
I checked what was holding the mount open:
bash
$ fuser -m /tmp/tmpo8dbr91e # nothing $ lsof +D /tmp/tmpo8dbr91e # nothing (just Docker overlay warnings)Nothing was using it. A force unmount also failed:
bash
$ sudo umount -f /tmp/tmpo8dbr91e umount: /tmp/tmpo8dbr91e: target is busy.Only a lazy unmount worked:
bash
$ sudo umount -l /tmp/tmpo8dbr91eSo I unmounted it and destroyed the stale boot environment manually. Then I retried the update. Same error, different temp path. Unmount, destroy, retry. Same error again. Each attempt, the updater would mount a new temporary directory, fail to unmount it, and bail out.
I even tried stopping Docker before the update, thinking the overlay mounts might be interfering. No luck.
The Real Problem
Frustrated, I rebooted the server thinking a clean slate might help. The server didn’t come back. After 10 minutes of pinging with no response, I plugged in a monitor and saw this:
console
Mounting 'boot-pool/ROOT/26.04.0-MASTER-20260213-020146' on '/root/' ... done. Begin: Running /scripts/local-bottom ... done. Begin: Running /scripts/nfs-bottom ... done. run-init: can't execute '/sbin/init': No such file or directory Target filesystem doesn't have requested /sbin/init. run-init: can't execute '/etc/init': No such file or directory run-init: can't execute '/bin/init': No such file or directory run-init: can't execute '/bin/sh': No such file or directory No init found. Try passing init= bootarg. BusyBox v1.37.0 (Debian 1:1.37.0-6+b3) built-in shell (ash) Enter 'help' for a list of built-in commands. (initramfs)The system had booted into the incomplete boot environment from the failed update — an empty shell with no operating system in it. The update process had set this as the default boot environment before it was fully built.
The Recovery
Fortunately, ZFS boot environments make this recoverable. I rebooted again, caught the GRUB menu, and selected my previous working boot environment (
20260210-020233). After booting successfully, I locked in the correct boot environment as the default:bash
$ sudo zpool set bootfs=boot-pool/ROOT/26.04.0-MASTER-20260210-020233 boot-poolThen cleaned up the broken environment:
bash
$ sudo zfs destroy -r boot-pool/ROOT/26.04.0-MASTER-20260213-020146Server back to normal.
Two Bugs, One Update
There are actually two separate bugs here:
Bug 1 — Stale Mount Cleanup The update process mounts the boot environment into a temp directory but can’t clean it up when something fails.umount -fdoesn’t work; onlyumount -ldoes. And since each retry creates a new temp mount, the problem is self-perpetuating.Bug 2 — Premature Bootfs Switch (Critical) This is the dangerous one. The updater sets the new boot environment as the GRUB default before it’s fully populated. When the update fails mid-way, you’re left with a system that will boot into an empty filesystem on the next reboot. If you don’t have physical console access and a keyboard handy, you could be in serious trouble.What Happens During a Failed Update
Update starts→Sets new bootfs→Build fails→Reboot = initramfsThe Fix Should Be Simple
The updater should only set the new boot environment as the default after the update is verified complete. And it should use
umount -las a fallback whenumount -ffails, since the standard force unmount clearly isn’t sufficient here.I’ve filed this as NAS-139794 on the TrueNAS Jira. If you’re running nightly builds, be aware of this issue — and make sure you have console access to your server in case you need to select a different boot environment from GRUB.
Lessons Learned
Running nightly builds is inherently risky, and I accept that. But an update failure should never leave a system unbootable. The whole point of ZFS boot environments is to provide a safety net — but that net has a hole when the updater switches the default before the new environment is ready.
In the meantime, keep a monitor and keyboard accessible for your TrueNAS box, and remember: if you ever drop to an initramfs shell after an update, your data is fine. Just reboot into GRUB and pick the previous boot environment.
-
The ArchZFS project has moved its official package repository from archzfs.com to GitHub Releases. Here’s how to migrate — and why this matters for Arch Linux ZFS users.
If you run ZFS on Arch Linux, you almost certainly depend on the ArchZFS project for your kernel modules. The project has been the go-to source for prebuilt ZFS packages on Arch for years, saving users from the pain of building DKMS modules on every kernel update.
The old
archzfs.comrepository has gone stale, and the project has migrated to serving packages directly from GitHub Releases. The packages are built the same way and provide the same set of packages — the only difference is a new PGP signing key and the repository URL.How to Migrate
If you’re currently using the old
archzfs.comserver in your/etc/pacman.conf, you need to update it. There are two options depending on your trust model.Option 1: Without PGP Verification
The PGP signing system is still being finalized, so if you just want it working right away, you can skip signature verification for now:
pacman.conf
[archzfs] SigLevel = Never Server = https://github.com/archzfs/archzfs/releases/download/experimentalOption 2: With PGP Verification (Recommended)
For proper package verification, import the new signing key first:
bash
# pacman-key --init # pacman-key --recv-keys 3A9917BF0DED5C13F69AC68FABEC0A1208037BE9 # pacman-key --lsign-key 3A9917BF0DED5C13F69AC68FABEC0A1208037BE9Then set the repo to require signatures:
pacman.conf
[archzfs] SigLevel = Required Server = https://github.com/archzfs/archzfs/releases/download/experimentalAfter updating your config, sync and refresh:
bash
# pacman -SyWhat’s Available
The repository provides the same package groups as before, targeting different kernels:
Package Group Kernel Use Case archzfs-linuxlinux (default) Best for most users, latest stable OpenZFS archzfs-linux-ltslinux-lts LTS kernel, better compatibility archzfs-linux-zenlinux-zen Zen kernel with extra features archzfs-linux-hardenedlinux-hardened Security-focused kernel archzfs-dkmsAny kernel Auto-rebuilds on kernel update, works with any kernel Note on DKMS vs Prebuilt Prebuilt packages are tied to a specific kernel version — if the Arch repos push a newer kernel than ArchZFS has built for, you’ll be blocked from updating until ArchZFS catches up. The DKMS packages avoid this by compiling locally, at the cost of longer update times. Choose based on your tolerance for build times vs. update delays.Why GitHub Releases?
Hosting a pacman repository on GitHub Releases is a clever approach. GitHub handles the CDN, availability, and bandwidth — no more worrying about a single server going down and blocking ZFS users from updating. The build pipeline uses GitHub Actions, so packages are built automatically and transparently. You can even inspect the build scripts in the repository itself.
The trade-off is that the URL is a bit unwieldy compared to the old
archzfs.com/$repo/$arch, but that’s a minor cosmetic issue.A Note of Caution
The project labels this as experimental and advises starting with non-critical systems. In practice, the packages are the same ones the community has been using — the “experimental” label applies to the new distribution method, not the packages themselves. Still, the PGP signing system is being reworked, so you may want to revisit your
SigLevelsetting once that’s finalized.If You’re Using the Old Repository The oldarchzfs.comrepository is stale and will not receive updates. If you haven’t migrated yet, do it now — before your nextpacman -Syupulls a kernel that your current ZFS modules don’t support, leaving you unable to import your pools after reboot.Quick Migration Checklist
Edit pacman.conf→Import new PGP key→pacman -Sy→pacman -SyuFor full details and ongoing updates, check the ArchZFS wiki and the release page.
-
Tutorial · February 2026 · 15 min read
QEMU on Arch Linux: A Practical Guide to Virtual Machine Testing
From cloud images and package building to kernel module debugging and cross-platform validation — all from the command line.
Contents
01 Why QEMU?
02 Spinning Up Arch Linux Cloud Images
03 Running FreeBSD in QEMU
04 Testing OpenZFS with QEMU
05 Sharing Files Between Host and Guest
06 Networking Options
07 Testing Real Hardware Drivers
08 Quick Reference
Why QEMU?
QEMU combined with KVM turns your Linux host into a bare-metal hypervisor. Unlike VirtualBox or VMware, QEMU offers direct access to hardware emulation options, PCI passthrough, and granular control over every aspect of the virtual machine. On Arch Linux, setup is minimal.
$ sudo pacman -S qemu-full

# Verify KVM support
$ lsmod | grep kvm
kvm_amd               200704  0
kvm                  1302528  1 kvm_amd
You should see
kvm_amdorkvm_intelloaded. That’s it — you’re ready to run VMs at near-native performance.Spinning Up Arch Linux Cloud Images
The fastest path to a working Arch Linux VM is the official cloud image — a pre-built qcow2 disk designed for automated provisioning with cloud-init.
Download and Prepare
$ curl -LO https://geo.mirror.pkgbuild.com/images/latest/Arch-Linux-x86_64-cloudimg.qcow2
$ qemu-img resize Arch-Linux-x86_64-cloudimg.qcow2 20G
The image ships at a minimal size. Resizing to 20G gives room for package building, compilation, and development work.
Cloud-Init Configuration
Cloud images expect a cloud-init seed to configure users, packages, and system settings on first boot. Install
cloud-utilson your host:$ sudo pacman -S cloud-utilsCreate a
user-datafile. Note the unquoted heredoc — this ensures shell variables expand correctly:SSH_KEY=$(cat ~/.ssh/id_ed25519.pub 2>/dev/null || cat ~/.ssh/id_rsa.pub) cat > user-data <<EOF #cloud-config users: - name: chris sudo: ALL=(ALL) NOPASSWD:ALL shell: /bin/bash lock_passwd: false plain_text_passwd: changeme ssh_authorized_keys: - ${SSH_KEY} packages: - base-devel - git - vim - devtools - namcap growpart: mode: auto devices: ['/'] EOF⚠ Common Pitfall
Using
'EOF'(single-quoted) prevents variable expansion, so${SSH_KEY}becomes a literal string. Always use unquotedEOFwhen you need variable substitution.Generate the seed ISO and launch:
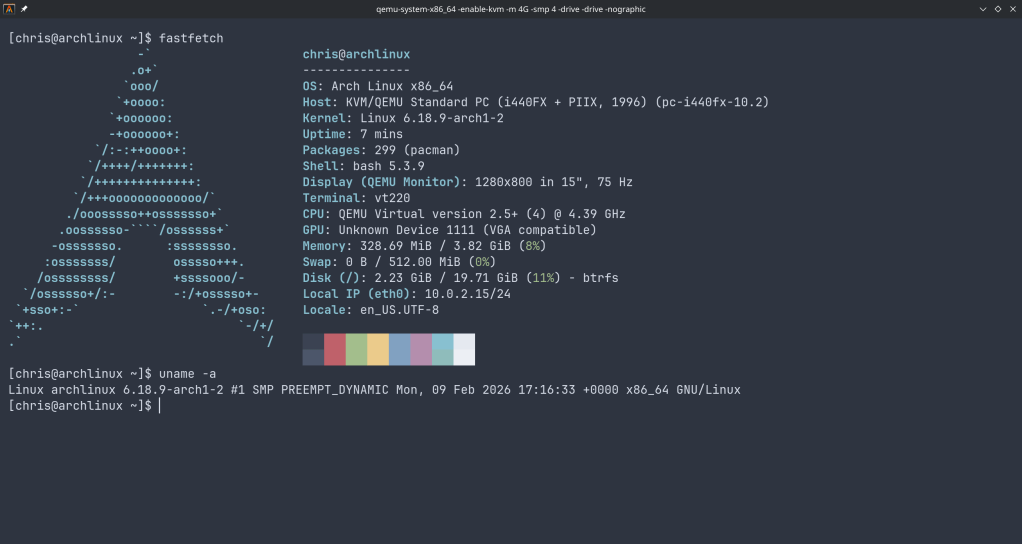
$ cloud-localds seed.iso user-data

$ qemu-system-x86_64 \
  -enable-kvm \
  -m 4G \
  -smp 4 \
  -drive file=Arch-Linux-x86_64-cloudimg.qcow2,if=virtio \
  -drive file=seed.iso,format=raw,if=virtio \
  -nographic
Cloud-Init Runs Once
Cloud-init marks itself as complete after the first boot. If you modify
user-dataand rebuildseed.iso, the existing image ignores it. You must download a fresh qcow2 image before applying new configuration.Use
Ctrl+A, Xto kill the VM.Running FreeBSD in QEMU
FreeBSD provides pre-built VM images in qcow2 format. FreeBSD 15.0-RELEASE (December 2025) is the latest stable release, while 16.0-CURRENT snapshots are available for testing bleeding-edge features.
Download
# FreeBSD 15.0 stable
$ curl -LO https://download.freebsd.org/releases/VM-IMAGES/15.0-RELEASE/amd64/Latest/FreeBSD-15.0-RELEASE-amd64-ufs.qcow2.xz
$ xz -d FreeBSD-15.0-RELEASE-amd64-ufs.qcow2.xz

# FreeBSD 16.0-CURRENT (development snapshot)
$ curl -LO https://download.freebsd.org/snapshots/VM-IMAGES/16.0-CURRENT/amd64/Latest/FreeBSD-16.0-CURRENT-amd64-ufs.qcow2.xz
$ xz -d FreeBSD-16.0-CURRENT-amd64-ufs.qcow2.xz

$ qemu-img resize FreeBSD-15.0-RELEASE-amd64-ufs.qcow2 20G
The Serial Console Challenge
Unlike Linux cloud images, FreeBSD VM images default to VGA console output. Launching with
-nographicappears to hang — the system is actually booting, but sending output to the emulated display.Boot with VGA first to configure serial:
$ qemu-system-x86_64 \
  -enable-kvm \
  -m 4G \
  -smp 4 \
  -hda FreeBSD-15.0-RELEASE-amd64-ufs.qcow2 \
  -vga std
Login as
root(no password), then enable serial console permanently:# echo 'console="comconsole"' >> /boot/loader.conf # poweroffAll subsequent boots work with
-nographic. Alternatively, at the FreeBSD boot menu, press 3 to escape to the loader prompt and typeset console=comconsolethenboot.Disk Interface Note
If FreeBSD fails to boot with
if=virtio, fall back to IDE emulation using-hdainstead. IDE is universally supported.Testing OpenZFS with QEMU
One of the most powerful uses of QEMU on Arch Linux is building and testing OpenZFS against new kernels. Arch’s rolling release model means kernel updates arrive frequently, and out-of-tree modules like ZFS need validation after every update.
Build Environment
$ git clone https://github.com/openzfs/zfs.git
$ cd zfs
$ ./autogen.sh
$ ./configure --enable-debug
$ make -j$(nproc)
$ sudo make install
$ sudo ldconfig
$ sudo modprobe zfs
Running the ZFS Test Suite
Before running the test suite, a critical and often-missed step — install the test helpers:
$ sudo ~/zfs/scripts/zfs-helpers.sh -i

# Create loop devices for virtual disks
for i in $(seq 0 15); do
  sudo mknod -m 0660 /dev/loop$i b 7 $i 2>/dev/null
done

# Run sanity tests
$ ~/zfs/scripts/zfs-tests.sh -v -r sanity
Real-World Debugging: From 18% to 97.6%
Testing OpenZFS 2.4.99 on kernel 6.18.8-arch2-1 revealed two cascading issues that dropped the pass rate dramatically. Here’s what happened and how to fix it.
Problem 1: Permission denied for ephemeral users. The test suite creates temporary users (
staff1,staff2) for permission testing. If your ZFS source directory is under a home directory with restrictive permissions, these users can’t traverse the path:err: env: 'ksh': Permission denied staff2 doesn't have permissions on /home/arch/zfs/tests/zfs-tests/bin$ chmod o+x /home/arch $ chmod -R o+rx /home/arch/zfs $ sudo chmod o+rw /dev/zfsProblem 2: Leftover test pools cascade failures. If a previous test run left a ZFS pool mounted, every subsequent setup script fails with “Device or resource busy”:
$ sudo zfs destroy -r testpool/testfs
$ sudo zpool destroy testpool
$ rm -rf /var/tmp/testdir
✓ Result
After fixing both issues, the sanity suite completed in 15 minutes: 808 PASS, 6 FAIL, 14 SKIP. The remaining 6 failures were all environment-related (missing packages) — zero kernel compatibility regressions.
Sharing Files Between Host and Guest
QEMU’s 9p virtfs protocol allows sharing a host directory with the guest without network configuration — ideal for an edit-on-host, build-in-guest workflow:
$ qemu-system-x86_64 \
  -enable-kvm \
  -m 4G \
  -smp 4 \
  -drive file=Arch-Linux-x86_64-cloudimg.qcow2,if=virtio \
  -virtfs local,path=/home/chris/shared,mount_tag=host_share,security_model=mapped-xattr,id=host_share \
  -nographic
Inside the guest:
$ sudo mount -t 9p -o trans=virtio host_share /mnt/sharedNetworking Options
QEMU’s user-mode networking (
-nic user) is the simplest setup — it provides NAT-based internet access and port forwarding without any host configuration:# Forward host port 2222 to guest SSH -nic user,hostfwd=tcp::2222-:22This is sufficient for most development and testing workflows. For bridged or TAP networking, consult the QEMU documentation.
Testing Real Hardware Drivers
QEMU emulates standard hardware (e1000 NICs, emulated VGA), not your actual devices. If you need to test drivers against real hardware — such as a Realtek Ethernet controller or an AMD GPU — you have two options:
PCI Passthrough (VFIO): Bind a real PCI device to the
vfio-pcidriver and pass it directly to the VM. This requires IOMMU support (amd_iommu=onin the kernel command line) and removes the device from the host for the duration.Native Boot from USB: Write a live image to a USB stick and boot your physical machine directly. For driver testing, this is almost always the better choice:
$ sudo dd if=FreeBSD-16.0-CURRENT-amd64-memstick.img of=/dev/sdX bs=4M status=progressQuick Reference
Task Command Start Arch VM qemu-system-x86_64 -enable-kvm -m 4G -smp 4 -drive file=arch.qcow2,if=virtio -drive file=seed.iso,format=raw,if=virtio -nographicStart FreeBSD (VGA) qemu-system-x86_64 -enable-kvm -m 4G -smp 4 -hda freebsd.qcow2 -vga stdStart FreeBSD (serial) qemu-system-x86_64 -enable-kvm -m 4G -smp 4 -hda freebsd.qcow2 -nographicKill VM Ctrl+A, XResize disk qemu-img resize image.qcow2 20GCreate seed ISO cloud-localds seed.iso user-data
QEMU Arch Linux FreeBSD OpenZFS KVM
Written from real-world testing on AMD Ryzen 9 9900X · Arch Linux · Kernel 6.18.8
-
How to set up a disposable VM for running the ZFS test suite on bleeding-edge kernels
Why This Matters
OpenZFS supports a wide range of Linux kernels, but regressions can slip through on newer ones. Arch Linux ships the latest stable kernels (6.18+ at the time of writing), making it an ideal platform for catching issues before they hit other distributions.
The ZFS test suite is the project’s primary quality gate — it exercises thousands of scenarios across pool creation, send/receive, snapshots, encryption, scrub, and more. Running it on your kernel version and reporting results is one of the most valuable contributions you can make, even without writing any code.
Why a VM, Not Docker?
This is the key architectural decision. ZFS is a kernel module — the test suite needs to:
- Load and unload
spl.koandzfs.kokernel modules - Create and destroy loopback block devices for test zpools
- Exercise kernel-level filesystem operations (mount, unmount, I/O)
- Potentially crash the kernel if a bug is triggered
Docker containers share the host kernel. If you load ZFS modules inside a container, they affect your entire host system. A crashing test could take down your workstation. With a QEMU/KVM virtual machine, you get a fully isolated kernel — crashes stay inside the VM, and you can just reboot it.
┌─────────────────────────────────────────────────┐│ HOST (your workstation) ││ Arch Linux · Kernel 6.18.8 · Your ZFS pools ││ ││ ┌───────────────────────────────────────────┐ ││ │ QEMU/KVM VM │ ││ │ Arch Linux · Kernel 6.18.7 │ ││ │ │ ││ │ ┌─────────────┐ ┌───────────────────┐ │ ││ │ │ spl.ko │ │ ZFS Test Suite │ │ ││ │ │ zfs.ko │ │ (file-backed │ │ ││ │ │ (from src) │ │ loopback vdevs) │ │ ││ │ └─────────────┘ └───────────────────┘ │ ││ │ │ ││ │ If something crashes → only VM affected │ ││ └──────────────────────────────────┬────────┘ ││ SSH :2222 ←┘ │└─────────────────────────────────────────────────┘What Is the Arch Linux Cloud Image?
We use the official Arch Linux cloud image — a minimal, pre-built qcow2 disk image maintained by the Arch Linux project. It’s designed for cloud/VM environments and includes:
- A minimal Arch Linux installation (no GUI, no bloat)
- cloud-init support for automated provisioning (user creation, SSH keys, hostname)
- A growable root filesystem (we resize it to 40G)
- systemd-networkd for automatic DHCP networking
This is NOT the “archzfs” project (archzfs.com provides prebuilt ZFS packages). We named our VM hostname “archzfs” for convenience, but we build ZFS entirely from source.
The cloud-init seed image is a tiny ISO that tells cloud-init how to configure the VM on first boot — what user to create, what password to set, what hostname to use. On a real cloud provider, this comes from the metadata service; for local QEMU, we create it manually.
Step-by-Step Setup
Prerequisites (Host)
# Install QEMU and toolssudo pacman -S qemu-full cdrtools# Optional: virt-manager for GUI managementsudo pacman -S virt-manager libvirt dnsmasqsudo systemctl enable --now libvirtdsudo usermod -aG libvirt $USER1. Download and Prepare the Cloud Image
mkdir ~/zfs-testvm && cd ~/zfs-testvm# Download the latest Arch Linux cloud imagewget https://geo.mirror.pkgbuild.com/images/latest/Arch-Linux-x86_64-cloudimg.qcow2# Resize to 40G (ZFS tests need space for file-backed vdevs)qemu-img resize Arch-Linux-x86_64-cloudimg.qcow2 40G2. Create the Cloud-Init Seed
mkdir -p /tmp/seed# User configurationcat > /tmp/seed/user-data << 'EOF'#cloud-confighostname: archzfsusers:- name: archshell: /bin/bashsudo: ALL=(ALL) NOPASSWD:ALLlock_passwd: falseplain_text_passwd: test123ssh_pwauth: trueEOF# Instance metadatacat > /tmp/seed/meta-data << 'EOF'instance-id: archzfs-001local-hostname: archzfsEOF# Build the seed ISOmkisofs -output seed.img -volid cidata -joliet -rock /tmp/seed/3. Boot the VM
qemu-system-x86_64 \-enable-kvm \-m 8G \-smp 8 \-drive file=Arch-Linux-x86_64-cloudimg.qcow2,if=virtio \-drive file=seed.img,if=virtio,format=raw \-nic user,hostfwd=tcp::2222-:22 \-nographicWhat each flag does:
Flag Purpose -enable-kvmUse hardware virtualization (huge performance gain) -m 8G8GB RAM (ZFS ARC cache benefits from more) -smp 88 virtual CPUs (adjust to your host) -drive ...qcow2,if=virtioBoot disk with virtio for best I/O -drive ...seed.imgCloud-init configuration -nic user,hostfwd=...User-mode networking with SSH port forward -nographicSerial console (no GUI window needed) Login will appear on the serial console. Credentials:
arch/test123.You can also SSH from another terminal:
ssh -p 2222 arch@localhost4. Install Build Dependencies (Inside VM)
sudo pacman -Syu --noconfirm \base-devel git autoconf automake libtool python \linux-headers libelf libaio openssl zlib \ksh bc cpio fio inetutils sysstat jq pax rsync \nfs-utils lsscsi xfsprogs parted perf5. Clone and Build ZFS
# Clone YOUR fork (replace with your GitHub username)git clone https://github.com/YOUR_USERNAME/zfs.gitcd zfs# Build everything./autogen.sh./configure --enable-debugmake -j$(nproc)The build compiles:
- Kernel modules (
spl.ko,zfs.ko) against the running kernel headers - Userspace tools (
zpool,zfs,zdb, etc.) - Test binaries and test scripts
Build time: ~5-10 minutes with 8 vCPUs.
Note: You’ll see many
objtoolwarnings aboutspl_panic()andluaD_throw()missing__noreturn. These are known issues on newer kernels and don’t affect functionality.6. Load Modules and Run Tests
# Load the ZFS kernel modulessudo scripts/zfs.sh# Verify modules are loadedlsmod | grep zfs# Run the FULL test suite (4-8 hours)scripts/zfs-tests.sh -v 2>&1 | tee /tmp/zts-full.txt# Or run a single test (for quick validation)scripts/zfs-tests.sh -v \-t /home/arch/zfs/tests/zfs-tests/tests/functional/cli_root/zpool_create/zpool_create_001_pos.kshImportant notes on
zfs-tests.sh:- Do NOT run as root — the script uses sudo internally
- The
-tflag requires absolute paths to individual.kshtest files - Missing utilities
netandpamtesterare okay — only NFS/PAM tests will skip - The “Permission denied” warning at startup is harmless
7. Extract and Analyze Results
From your host machine:
# Copy the summary logscp -P 2222 arch@localhost:/tmp/zts-full.txt ~/zts-full.txt# Copy detailed per-test logsscp -r -P 2222 arch@localhost:/var/tmp/test_results/ ~/zfs-test-results/Understanding the Results
The test results summary looks like:
Results SummaryPASS 2847FAIL 12SKIP 43Running Time: 05:23:17What to look for:
- Compare against known failures — check the ZFS Test Suite Failures wiki
- Identify NEW failures — any FAIL not on the known list for your kernel version
- Check the detailed logs — in
/var/tmp/test_results/<timestamp>/each test has stdout/stderr output
Reporting Results
If you find new failures, file a GitHub issue at openzfs/zfs with:
Title: Test failure: <test_name> on Linux 6.18.7 (Arch Linux)**Environment:**- OS: Arch Linux (cloud image)- Kernel: 6.18.7-arch1-1- ZFS: built from master (commit <hash>)- VM: QEMU/KVM, 8 vCPU, 8GB RAM**Failed test:**<test name and path>**Test output:**<paste relevant log output>**Expected behavior:**Test should PASS (passes on kernel X.Y.Z / other distro)Tips and Tricks
Snapshot the VM after setup to avoid repeating the build:
# On host, after VM is set up and ZFS is builtqemu-img snapshot -c "zfs-built" Arch-Linux-x86_64-cloudimg.qcow2# Restore laterqemu-img snapshot -a "zfs-built" Arch-Linux-x86_64-cloudimg.qcow2Run a subset of tests by test group:
# All zpool testsfor t in /home/arch/zfs/tests/zfs-tests/tests/functional/cli_root/zpool_*/*.ksh; doecho "$t"done# Run tests matching a patternfind /home/arch/zfs/tests/zfs-tests/tests/functional -name "*.ksh" | grep snapshot | head -5Increase disk space if tests fail with ENOSPC:
# On host (VM must be stopped)qemu-img resize Arch-Linux-x86_64-cloudimg.qcow2 +20G# Inside VM after rebootsudo growpart /dev/vda 3 # or whichever partitionsudo resize2fs /dev/vda3Suppress floppy drive errors (the harmless
I/O error, dev fd0messages):# Add to QEMU command line:-fda none
This guide was written while setting up an OpenZFS test environment for kernel 6.18.7 on Arch Linux. The same approach works for any Linux distribution that provides cloud images — just swap the base image and package manager commands.
OpenZFS Test VM Architecture
QEMU/KVM + Arch Linux Cloud Image + ZFS from Source
Host MachineHardware Arch Linux · Kernel 6.18.8 · 24 coresHypervisor QEMU 9.x + KVM (hardware virtualization)VM Disk Arch-Linux-x86_64-cloudimg.qcow2 (resized 40G)Cloud-Init Seed seed.img (ISO9660) → user, password, hostnameNetwork User-mode networking · hostfwd :2222→:22Get Results scp -P 2222 arch@localhost:/var/tmp/test_results/ .SSH
:2222 ⇄ serial
ttyS0QEMU VM (archzfs)Guest OS Arch Linux · Kernel 6.18.7 · 8 vCPU · 8GB RAMCloud-Init User: arch · Pass: test123 · NOPASSWD sudoZFS Source (from fork) git clone github.com/YOUR_USER/zfs
./autogen.sh → ./configure –enable-debug → make -j8ZFS Kernel Modules scripts/zfs.sh → loads spl.ko + zfs.koZFS Test Suite scripts/zfs-tests.sh -v
Uses loopback devices (file-vdev0..2)Test Results /var/tmp/test_results/YYYYMMDDTHHMMSS/
Per-test logs with pass/fail/skip⚠ Why a VM instead of Docker?
ZFS tests need to load and unload kernel modules (spl.ko, zfs.ko). Docker containers share the host kernel — loading ZFS modules in a container affects your host system and could crash it. A QEMU/KVM VM has its own isolated kernel, so module crashes stay contained. The VM also provides loopback block devices for creating test zpools, which Docker can’t safely offer.
Setup Flow
1Get Cloud Image
Download official Arch cloud image. Resize qcow2 to 40G with
qemu-img resize.2Create Cloud-Init
Write user-data + meta-data YAML. Build ISO seed with
mkisofs.3Boot VM
qemu-system-x86_64 -enable-kvm -m 8G -smp 8with SSH forward on 2222.4Install Deps
pacman -S base-devel git ksh bc fio linux-headersand test dependencies.5Build ZFS
Clone fork →
autogen.sh→configure→make -j86Load & Test
scripts/zfs.shloads modules.zfs-tests.sh -vruns the suite (4-8h).7Extract Results
SCP results to host. Compare against known failures. Report regressions on GitHub.
- Load and unload