I recently added my AUR package ankiR to the BioArchLinux repository, a repo that contains the majority of R Language related packages such as r-tidyverse etc.

I recently added my AUR package ankiR to the BioArchLinux repository, a repo that contains the majority of R Language related packages such as r-tidyverse etc.
The ArchZFS project has moved its official package repository from archzfs.com to GitHub Releases. Here’s how to migrate — and why this matters for Arch Linux ZFS users.
If you run ZFS on Arch Linux, you almost certainly depend on the ArchZFS project for your kernel modules. The project has been the go-to source for prebuilt ZFS packages on Arch for years, saving users from the pain of building DKMS modules on every kernel update.
The old archzfs.com repository has gone stale, and the project has migrated to serving packages directly from GitHub Releases. The packages are built the same way and provide the same set of packages — the only difference is a new PGP signing key and the repository URL.
If you’re currently using the old archzfs.com server in your /etc/pacman.conf, you need to update it. There are two options depending on your trust model.
The PGP signing system is still being finalized, so if you just want it working right away, you can skip signature verification for now:
pacman.conf[archzfs]
SigLevel = Never
Server = https://github.com/archzfs/archzfs/releases/download/experimental
For proper package verification, import the new signing key first:
bash# pacman-key --init
# pacman-key --recv-keys 3A9917BF0DED5C13F69AC68FABEC0A1208037BE9
# pacman-key --lsign-key 3A9917BF0DED5C13F69AC68FABEC0A1208037BE9
Then set the repo to require signatures:
pacman.conf[archzfs]
SigLevel = Required
Server = https://github.com/archzfs/archzfs/releases/download/experimental
After updating your config, sync and refresh:
bash# pacman -Sy
The repository provides the same package groups as before, targeting different kernels:
| Package Group | Kernel | Use Case |
|---|---|---|
archzfs-linux | linux (default) | Best for most users, latest stable OpenZFS |
archzfs-linux-lts | linux-lts | LTS kernel, better compatibility |
archzfs-linux-zen | linux-zen | Zen kernel with extra features |
archzfs-linux-hardened | linux-hardened | Security-focused kernel |
archzfs-dkms | Any kernel | Auto-rebuilds on kernel update, works with any kernel |
Hosting a pacman repository on GitHub Releases is a clever approach. GitHub handles the CDN, availability, and bandwidth — no more worrying about a single server going down and blocking ZFS users from updating. The build pipeline uses GitHub Actions, so packages are built automatically and transparently. You can even inspect the build scripts in the repository itself.
The trade-off is that the URL is a bit unwieldy compared to the old archzfs.com/$repo/$arch, but that’s a minor cosmetic issue.
The project labels this as experimental and advises starting with non-critical systems. In practice, the packages are the same ones the community has been using — the “experimental” label applies to the new distribution method, not the packages themselves. Still, the PGP signing system is being reworked, so you may want to revisit your SigLevel setting once that’s finalized.
archzfs.com repository is stale and will not receive updates. If you haven’t migrated yet, do it now — before your next pacman -Syu pulls a kernel that your current ZFS modules don’t support, leaving you unable to import your pools after reboot.
For full details and ongoing updates, check the ArchZFS wiki and the release page.
Tutorial · February 2026 · 15 min read
From cloud images and package building to kernel module debugging and cross-platform validation — all from the command line.
Contents
01 Why QEMU?
02 Spinning Up Arch Linux Cloud Images
03 Running FreeBSD in QEMU
04 Testing OpenZFS with QEMU
05 Sharing Files Between Host and Guest
06 Networking Options
07 Testing Real Hardware Drivers
08 Quick Reference
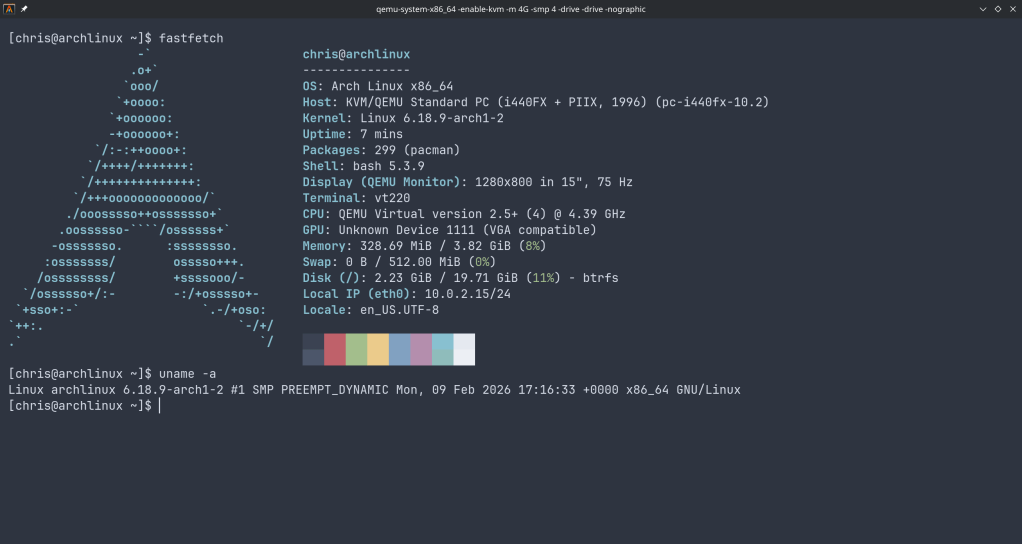
QEMU combined with KVM turns your Linux host into a bare-metal hypervisor. Unlike VirtualBox or VMware, QEMU offers direct access to hardware emulation options, PCI passthrough, and granular control over every aspect of the virtual machine. On Arch Linux, setup is minimal.
$ sudo pacman -S qemu-full

# Verify KVM support
$ lsmod | grep kvm
kvm_amd               200704  0
kvm                  1302528  1 kvm_amd
You should see kvm_amd or kvm_intel loaded. That’s it — you’re ready to run VMs at near-native performance.
The fastest path to a working Arch Linux VM is the official cloud image — a pre-built qcow2 disk designed for automated provisioning with cloud-init.
$ curl -LO https://geo.mirror.pkgbuild.com/images/latest/Arch-Linux-x86_64-cloudimg.qcow2
$ qemu-img resize Arch-Linux-x86_64-cloudimg.qcow2 20G
The image ships at a minimal size. Resizing to 20G gives room for package building, compilation, and development work.
Cloud images expect a cloud-init seed to configure users, packages, and system settings on first boot. Install cloud-utils on your host:
$ sudo pacman -S cloud-utilsCreate a user-data file. Note the unquoted heredoc — this ensures shell variables expand correctly:
SSH_KEY=$(cat ~/.ssh/id_ed25519.pub 2>/dev/null || cat ~/.ssh/id_rsa.pub)
cat > user-data <<EOF
#cloud-config
users:
  - name: chris
    sudo: ALL=(ALL) NOPASSWD:ALL
    shell: /bin/bash
    lock_passwd: false
    plain_text_passwd: changeme
    ssh_authorized_keys:
      - ${SSH_KEY}
packages:
  - base-devel
  - git
  - vim
  - devtools
  - namcap
growpart:
  mode: auto
  devices: ['/']
EOF
⚠ Common Pitfall
Using 'EOF' (single-quoted) prevents variable expansion, so ${SSH_KEY} becomes a literal string. Always use unquoted EOF when you need variable substitution.
Generate the seed ISO and launch:
$ cloud-localds seed.iso user-data

$ qemu-system-x86_64 \
  -enable-kvm \
  -m 4G \
  -smp 4 \
  -drive file=Arch-Linux-x86_64-cloudimg.qcow2,if=virtio \
  -drive file=seed.iso,format=raw,if=virtio \
  -nographic
Cloud-Init Runs Once
Cloud-init marks itself as complete after the first boot. If you modify user-data and rebuild seed.iso, the existing image ignores it. You must download a fresh qcow2 image before applying new configuration.
Use Ctrl+A, X to kill the VM.
FreeBSD provides pre-built VM images in qcow2 format. FreeBSD 15.0-RELEASE (December 2025) is the latest stable release, while 16.0-CURRENT snapshots are available for testing bleeding-edge features.
# FreeBSD 15.0 stable
$ curl -LO https://download.freebsd.org/releases/VM-IMAGES/15.0-RELEASE/amd64/Latest/FreeBSD-15.0-RELEASE-amd64-ufs.qcow2.xz
$ xz -d FreeBSD-15.0-RELEASE-amd64-ufs.qcow2.xz

# FreeBSD 16.0-CURRENT (development snapshot)
$ curl -LO https://download.freebsd.org/snapshots/VM-IMAGES/16.0-CURRENT/amd64/Latest/FreeBSD-16.0-CURRENT-amd64-ufs.qcow2.xz
$ xz -d FreeBSD-16.0-CURRENT-amd64-ufs.qcow2.xz

$ qemu-img resize FreeBSD-15.0-RELEASE-amd64-ufs.qcow2 20GUnlike Linux cloud images, FreeBSD VM images default to VGA console output. Launching with -nographic appears to hang — the system is actually booting, but sending output to the emulated display.
Boot with VGA first to configure serial:
$ qemu-system-x86_64 \
  -enable-kvm \
  -m 4G \
  -smp 4 \
  -hda FreeBSD-15.0-RELEASE-amd64-ufs.qcow2 \
  -vga std
Login as root (no password), then enable serial console permanently:
# echo 'console="comconsole"' >> /boot/loader.conf
# poweroff
All subsequent boots work with -nographic. Alternatively, at the FreeBSD boot menu, press 3 to escape to the loader prompt and type set console=comconsole then boot.
Disk Interface Note
If FreeBSD fails to boot with if=virtio, fall back to IDE emulation using -hda instead. IDE is universally supported.
One of the most powerful uses of QEMU on Arch Linux is building and testing OpenZFS against new kernels. Arch’s rolling release model means kernel updates arrive frequently, and out-of-tree modules like ZFS need validation after every update.
$ git clone https://github.com/openzfs/zfs.git
$ cd zfs
$ ./autogen.sh
$ ./configure --enable-debug
$ make -j$(nproc)
$ sudo make install
$ sudo ldconfig
$ sudo modprobe zfsBefore running the test suite, a critical and often-missed step — install the test helpers:
$ sudo ~/zfs/scripts/zfs-helpers.sh -i

# Create loop devices for virtual disks
for i in $(seq 0 15); do
  sudo mknod -m 0660 /dev/loop$i b 7 $i 2>/dev/null
done

# Run sanity tests
$ ~/zfs/scripts/zfs-tests.sh -v -r sanityTesting OpenZFS 2.4.99 on kernel 6.18.8-arch2-1 revealed two cascading issues that dropped the pass rate dramatically. Here’s what happened and how to fix it.
Problem 1: Permission denied for ephemeral users. The test suite creates temporary users (staff1, staff2) for permission testing. If your ZFS source directory is under a home directory with restrictive permissions, these users can’t traverse the path:
err: env: 'ksh': Permission denied
staff2 doesn't have permissions on /home/arch/zfs/tests/zfs-tests/bin
$ chmod o+x /home/arch
$ chmod -R o+rx /home/arch/zfs
$ sudo chmod o+rw /dev/zfsProblem 2: Leftover test pools cascade failures. If a previous test run left a ZFS pool mounted, every subsequent setup script fails with “Device or resource busy”:
$ sudo zfs destroy -r testpool/testfs
$ sudo zpool destroy testpool
$ rm -rf /var/tmp/testdir
✓ Result
After fixing both issues, the sanity suite completed in 15 minutes: 808 PASS, 6 FAIL, 14 SKIP. The remaining 6 failures were all environment-related (missing packages) — zero kernel compatibility regressions.
QEMU’s 9p virtfs protocol allows sharing a host directory with the guest without network configuration — ideal for an edit-on-host, build-in-guest workflow:
$ qemu-system-x86_64 \
  -enable-kvm \
  -m 4G \
  -smp 4 \
  -drive file=Arch-Linux-x86_64-cloudimg.qcow2,if=virtio \
  -virtfs local,path=/home/chris/shared,mount_tag=host_share,security_model=mapped-xattr,id=host_share \
  -nographic
Inside the guest:
$ sudo mount -t 9p -o trans=virtio host_share /mnt/sharedQEMU’s user-mode networking (-nic user) is the simplest setup — it provides NAT-based internet access and port forwarding without any host configuration:
# Forward host port 2222 to guest SSH
-nic user,hostfwd=tcp::2222-:22
This is sufficient for most development and testing workflows. For bridged or TAP networking, consult the QEMU documentation.
QEMU emulates standard hardware (e1000 NICs, emulated VGA), not your actual devices. If you need to test drivers against real hardware — such as a Realtek Ethernet controller or an AMD GPU — you have two options:
PCI Passthrough (VFIO): Bind a real PCI device to the vfio-pci driver and pass it directly to the VM. This requires IOMMU support (amd_iommu=on in the kernel command line) and removes the device from the host for the duration.
Native Boot from USB: Write a live image to a USB stick and boot your physical machine directly. For driver testing, this is almost always the better choice:
$ sudo dd if=FreeBSD-16.0-CURRENT-amd64-memstick.img of=/dev/sdX bs=4M status=progress| Task | Command |
|---|---|
| Start Arch VM | qemu-system-x86_64 -enable-kvm -m 4G -smp 4 -drive file=arch.qcow2,if=virtio -drive file=seed.iso,format=raw,if=virtio -nographic |
| Start FreeBSD (VGA) | qemu-system-x86_64 -enable-kvm -m 4G -smp 4 -hda freebsd.qcow2 -vga std |
| Start FreeBSD (serial) | qemu-system-x86_64 -enable-kvm -m 4G -smp 4 -hda freebsd.qcow2 -nographic |
| Kill VM | Ctrl+A, X |
| Resize disk | qemu-img resize image.qcow2 20G |
| Create seed ISO | cloud-localds seed.iso user-data |
QEMU Arch Linux FreeBSD OpenZFS KVM
Written from real-world testing on AMD Ryzen 9 9900X · Arch Linux · Kernel 6.18.8
lsblk -o NAME,FSTYPE,LABEL,MOUNTPOINT,SIZE,MODEL

“An Arch Linux user on Wednesday uploaded malicious AUR packages of firefox-patch-bin, librewolf-fix-bin, and zen-browser-patched-bin. These AUR packages ended up installing a binary file from a GitHub repository that ended up being a remote access trojan.”

With 6.14.9 kernel

With the 6.14.4 Linux Kernel.
“Valkey, a high-performance key/value datastore, will be replacing redis in the [extra] repository. This change is due to Redis modifying its license from BSD-3-Clause to RSALv2 and SSPLv1 on March 20th, 2024.”
https://archlinux.org/news/valkey-to-replace-redis-in-the-extra-repository/