Using AI to generate Anki flashcards has evolved rapidly over the past couple of years. Here’s a look at how it started and where we are in 2026.
The Beginning: ChatGPT Prompts (2023)
The first to provide an Anki flashcard-generating ChatGPT prompt was Jarret Lee in this Anki forums post: Casting a Spell on ChatGPT: Let it Write Anki Cards for You. The idea was simple — give ChatGPT a structured prompt and it returns properly formatted flashcards you can import.
AnkiBrain Add-on
Shortly after, the AnkiBrain add-on was developed, integrating AI directly into Anki’s interface. This made it possible to generate cards without leaving the application.
Current Landscape (2026)
The ecosystem has exploded. Here are the main tools available today:
AnkiDecks AI — upload PDFs, PowerPoints, Word docs, or even YouTube links and get flashcards generated instantly
Ankify — turns notes, PDFs, and slides into export-ready Anki decks with card preview and editing before export
NovaCards — uses LLMs to generate cards from class notes, with a companion Anki plugin for in-app generation
AnkiAIUtils — AI-powered tools to enhance existing cards with explanations, mnemonics, and illustrations
Agentic AI approaches — tools like Claude Code can now generate batches of contextualised cards by describing the pattern you want
MCP interfaces — AI models can now interact directly with your Anki collection through MCP connectors
My Approach
I still prefer writing my own cards for deep learning, but AI-generated cards are great for:
Quickly converting lecture notes or documentation into reviewable material
Generating vocabulary cards in bulk
Creating first-pass cards that you then refine manually
The key is to always review AI-generated cards before adding them to your collection. Bad cards lead to bad learning.
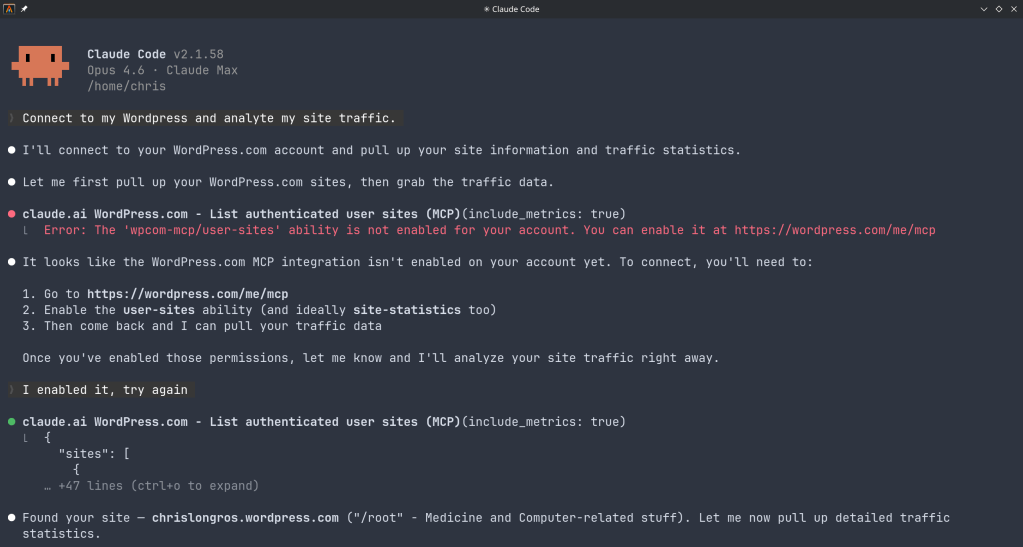
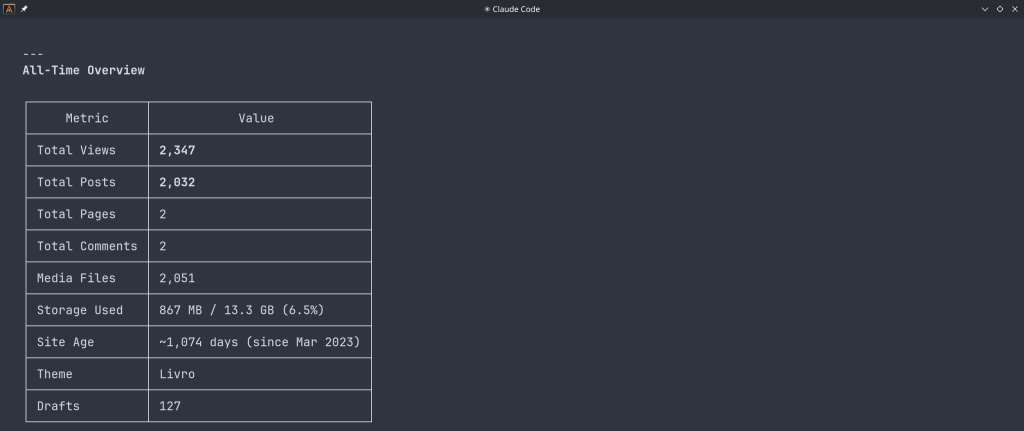
“The WordPress.com MCP server allows AI assistants to securely interact with your WordPress.com sites. It exposes tools for listing, searching, and viewing posts, pages, and comments, managing users and site settings, and retrieving statistics. By leveraging OAuth 2.1, it ensures that agents only access resources you’ve approved, making it easy to integrate AI-driven workflows into your publishing experience.”
You can use WordPress.com to:
Manage Content: “Show me my latest blog posts” or “Search for posts about technology”
View Analytics: “What are my site statistics for this month?”
Manage Users: “List all users on my WordPress site”
Site Administration: “Check my site settings and installed plugins”
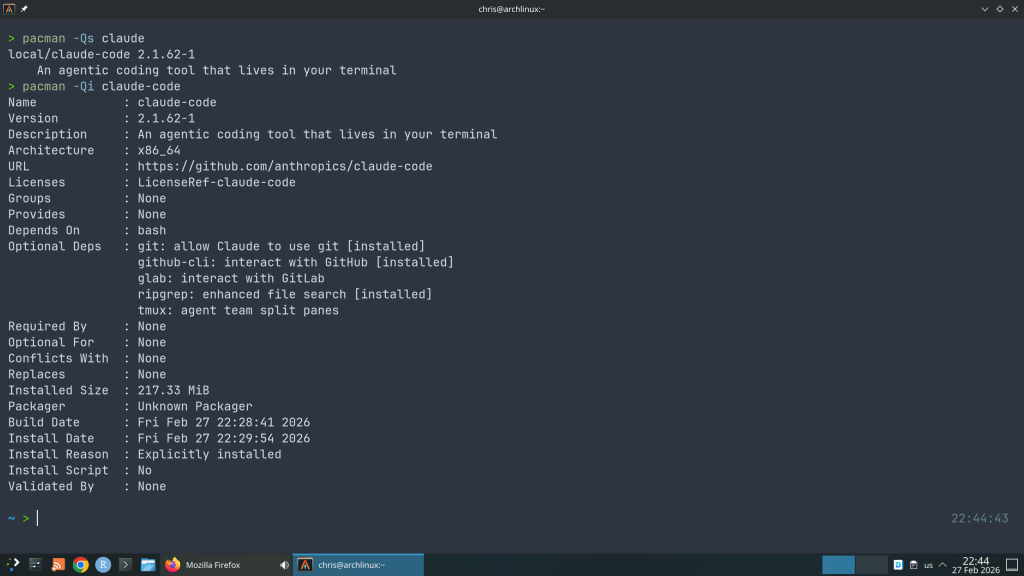
And I wondered why so many AUR package updates for the claude-code …
“Cybersecurity researchers have disclosed multiple security vulnerabilities in Anthropic’s Claude Code, an artificial intelligence (AI)-powered coding assistant, that could result in remote code execution and theft of API credentials.”
“The vulnerabilities exploit various configuration mechanisms, including Hooks, Model Context Protocol (MCP) servers, and environment variables – executing arbitrary shell commands and exfiltrating Anthropic API keys when users clone and open untrusted repositories”
The ArchZFS project has moved its official package repository from archzfs.com to GitHub Releases. Here’s how to migrate — and why this matters for Arch Linux ZFS users.
If you run ZFS on Arch Linux, you almost certainly depend on the ArchZFS project for your kernel modules. The project has been the go-to source for prebuilt ZFS packages on Arch for years, saving users from the pain of building DKMS modules on every kernel update.
The old archzfs.com repository has gone stale, and the project has migrated to serving packages directly from GitHub Releases. The packages are built the same way and provide the same set of packages — the only difference is a new PGP signing key and the repository URL.
How to Migrate
If you’re currently using the old archzfs.com server in your /etc/pacman.conf, you need to update it. There are two options depending on your trust model.
Option 1: Without PGP Verification
The PGP signing system is still being finalized, so if you just want it working right away, you can skip signature verification for now:
pacman.conf[archzfs]
SigLevel = Never
Server = https://github.com/archzfs/archzfs/releases/download/experimental
Option 2: With PGP Verification (Recommended)
For proper package verification, import the new signing key first:
pacman.conf[archzfs]
SigLevel = Required
Server = https://github.com/archzfs/archzfs/releases/download/experimental
After updating your config, sync and refresh:
bash# pacman -Sy
What’s Available
The repository provides the same package groups as before, targeting different kernels:
Package Group
Kernel
Use Case
archzfs-linux
linux (default)
Best for most users, latest stable OpenZFS
archzfs-linux-lts
linux-lts
LTS kernel, better compatibility
archzfs-linux-zen
linux-zen
Zen kernel with extra features
archzfs-linux-hardened
linux-hardened
Security-focused kernel
archzfs-dkms
Any kernel
Auto-rebuilds on kernel update, works with any kernel
Note on DKMS vs Prebuilt
Prebuilt packages are tied to a specific kernel version — if the Arch repos push a newer kernel than ArchZFS has built for, you’ll be blocked from updating until ArchZFS catches up. The DKMS packages avoid this by compiling locally, at the cost of longer update times. Choose based on your tolerance for build times vs. update delays.
Why GitHub Releases?
Hosting a pacman repository on GitHub Releases is a clever approach. GitHub handles the CDN, availability, and bandwidth — no more worrying about a single server going down and blocking ZFS users from updating. The build pipeline uses GitHub Actions, so packages are built automatically and transparently. You can even inspect the build scripts in the repository itself.
The trade-off is that the URL is a bit unwieldy compared to the old archzfs.com/$repo/$arch, but that’s a minor cosmetic issue.
A Note of Caution
The project labels this as experimental and advises starting with non-critical systems. In practice, the packages are the same ones the community has been using — the “experimental” label applies to the new distribution method, not the packages themselves. Still, the PGP signing system is being reworked, so you may want to revisit your SigLevel setting once that’s finalized.
If You’re Using the Old Repository
The old archzfs.com repository is stale and will not receive updates. If you haven’t migrated yet, do it now — before your next pacman -Syu pulls a kernel that your current ZFS modules don’t support, leaving you unable to import your pools after reboot.
WordPress.com strips <style> tags from posts. Here’s how to work around that and create beautifully styled technical articles with custom typography, code blocks, and layout components — without a self-hosted installation.
If you’ve ever tried to write a technical blog post on WordPress.com and found the default styling lacking — ugly code blocks, no control over fonts, tables that look like spreadsheets from 2005 — you’ve hit the platform’s biggest limitation. WordPress.com sanitizes post HTML aggressively, stripping out <style> and <link> tags for security reasons.
This post documents the approach I use to get full control over article styling on a WordPress.com Premium plan, without needing a self-hosted WordPress installation.
The Problem
WordPress.com’s block editor (Gutenberg) gives you paragraphs, headings, images, and code blocks. But the built-in styling is generic — it inherits your theme’s defaults, which are designed for broad appeal, not for technical writing. Specifically:
Code blocks use your theme’s monospace font with minimal contrast. No syntax highlighting, no language labels, no dark background that signals “this is code” to a scanning reader.
Tables get basic browser defaults — no header styling, inconsistent padding, no visual hierarchy between header and data rows.
Callout boxes don’t exist natively. You can use a Quote block, but it looks like a quote, not like a tip or warning. There’s no way to add a colored left border with a label.
Typography is locked to your theme. If your theme uses a system font stack, every post looks like a Google Doc.
The obvious fix — adding a <style> block to your post HTML — doesn’t work. WordPress.com strips it on save.
The Solution: Additional CSS + Custom HTML Blocks
The approach splits styling from content across two places:
Additional CSS site-wide styles
+
Custom HTML Block post content with classes
=
Styled Post fonts, colors, layout
Additional CSS lives in the WordPress Customizer (Appearance → Customize → Additional CSS, or via the Site Editor on block themes). It’s injected into every page’s <head> as a legitimate <style> block. WordPress.com allows this on paid plans (Personal and above) because it’s a controlled environment — you’re editing a dedicated CSS field, not injecting arbitrary HTML into post content.
Custom HTML blocks in the post editor accept raw HTML with class attributes. WordPress.com doesn’t strip class from elements, so your post HTML can reference any class defined in Additional CSS.
The result: your CSS lives in one place and applies to all posts. Your post content is clean, semantic HTML with descriptive class names. No inline styles, no duplication, no fighting the sanitizer.
Setting Up the CSS
I scope everything under a single wrapper class — .rss-post — to avoid polluting the rest of the site. Every selector starts with .rss-post, so the styles only apply inside posts that use the wrapper div.
Fonts
The CSS imports three fonts from Google Fonts via @import:
Newsreader is an optical-size serif that works beautifully for body text — it adjusts its weight and contrast based on font size, so headings and body text both look sharp without manual tweaking. JetBrains Mono is a purpose-built coding font with ligatures and distinct characters for 0/O and 1/l/I. DM Sans handles UI elements like labels, table headers, and info box titles — places where a clean sans-serif reads better than a serif.
The accent system
A single accent color (#e07a2f, a warm amber) ties the design together. It appears in four places: the left border on headings, the left border on info boxes, the info box label text, and link hover states. This creates visual consistency without overwhelming the page.
The ::before pseudo-element creates the accent bar. This is one of the things you can’t do with inline styles — pseudo-elements only work in stylesheets, which is exactly why Additional CSS is necessary.
Code blocks
The default WordPress code block is functional but visually flat. The custom CSS gives code blocks a dark background (#1e1e2e, matching the Catppuccin Mocha palette), a subtle border, and generous padding. A floating language label in the top-right corner uses a <span class="label"> inside the <pre> block:
Inline code gets a light warm background (#edebe6) that’s visible without being distracting.
Info boxes
Tips, warnings, and gotchas use the .infobox class — a light background with an amber left border and an uppercase label:
Example
This is what an info box looks like. The label is a <strong> element styled with uppercase text and the accent color. The background is a warm off-white that distinguishes it from the main content without creating harsh contrast.
The HTML for this is minimal:
html<div class="infobox">
  <strong>Tip</strong>
  Your message here.
</div>
Flow diagrams
For simple architecture or process diagrams, the .flow class creates a horizontal flex layout with dark boxes and arrow separators:
Step 1
→
Step 2
→
Step 3
The .accent modifier highlights one box in amber. On mobile, the flex container wraps naturally.
Writing a Post
The workflow for creating a styled post is:
1. Create a new post in the WordPress editor.
2. Add a Custom HTML block (not a Paragraph, not a Code block). Click the + button, search for “Custom HTML”.
3. Paste your HTML wrapped in <div class="rss-post">. Use standard HTML tags — <h2>, <p>, <pre><code>, <table> — with the custom classes where needed (.infobox, .flow, .label, .lead).
4. Preview and publish. The Additional CSS applies automatically.
Important
Use a single Custom HTML block for the entire post, not multiple blocks. If you mix Custom HTML blocks with regular Paragraph or Heading blocks, the regular blocks won’t be inside the .rss-post wrapper and won’t get the custom styling.
Why Not Use the Block Editor Natively?
A reasonable question. Gutenberg’s blocks do offer some styling — you can set colors, font sizes, and spacing per block. But there are real limitations:
No custom fonts. You’re limited to what your theme provides plus WordPress.com’s font library. Want JetBrains Mono for code? Not an option through the block editor.
No pseudo-elements. The accent bar on headings uses ::before. There’s no block editor control for that.
No reusable component patterns. An info box with a colored border, background, and styled label would need manual per-block styling every time. With CSS classes, it’s one <div class="infobox">.
No code block theming. The built-in Code block doesn’t support dark themes, language labels, or custom fonts.
Consistency. When all styling comes from a single CSS file, every post looks consistent. Per-block styling drifts over time.
Available Components
Here’s a quick reference for the CSS classes available in the current stylesheet:
Class
Element
Purpose
.rss-post
<div>
Wrapper — all styles are scoped under this
.lead
<p>
Subtitle / intro paragraph in muted gray
.infobox
<div>
Tip / warning / note callout box
.flow
<div>
Horizontal flow diagram container
.flow-box
<div>
Individual box in a flow diagram
.flow-box.accent
<div>
Highlighted (amber) flow box
.flow-arrow
<span>
Arrow between flow boxes
.label
<span>
Language label inside <pre> blocks
.tag-list
<ul>
Horizontal tag/category pills
The Tradeoff
This approach is not without downsides. You’re writing raw HTML instead of using the visual editor, which is slower and more error-prone. The post editor’s preview won’t show the custom styles (you need to use the site preview or publish as draft). And if you ever change themes, the Additional CSS carries over but may need adjustments to avoid conflicts with the new theme’s styles.
For me, the tradeoff is worth it. I write technical content with code blocks, tables, and diagrams. The default WordPress.com styling doesn’t serve that content well, and this approach gives me full control without needing to self-host WordPress or pay for a Business plan with plugin access.
One CSS file. Clean HTML with classes. Posts that actually look the way you want them to.
How to bring back RSS feeds for sites that removed them, scrape full article content, and unify everything in a single self-hosted reader.
RSS isn’t dead — it’s just been abandoned by publishers chasing engagement metrics and walled gardens. Websites that once offered clean XML feeds now force you into newsletters, push notifications, or algorithmic timelines. But with a bit of self-hosting, you can take that control back.
This post walks through my setup: FreshRSS as the reader, RSS-Bridge as the scraper for sites that killed their feeds, all running on TrueNAS Scale with Docker and exposed through Tailscale for secure remote access.
The Architecture
The data flow is straightforward:
Website (no RSS)
→
RSS-Bridge scrapes & generates feed
→
FreshRSS polls & displays
→
You browser / app
For sites that still offer RSS, FreshRSS subscribes directly. For sites that removed their feeds, RSS-Bridge sits in between — it loads the page, parses the HTML with CSS selectors, and generates a standard Atom feed that FreshRSS can consume like any other subscription.
Why RSS-Bridge Over Alternatives
There are several tools that can generate feeds from websites. I chose RSS-Bridge for a few reasons:
Lightweight. RSS-Bridge is PHP-based and runs in about 50 MB of RAM. Compare that with RSSHub (Node.js, 300 MB+) or Huginn (Ruby, even heavier). On a NAS where every container counts, this matters.
FreshRSS integration. There’s a native FreshRSS extension (xExtension-RssBridge) if you want tight integration, though the simpler approach — just subscribing to the generated feed URL — works perfectly and survives app updates.
CssSelectorBridge. This built-in bridge is incredibly flexible. Give it a URL, tell it which CSS selectors match your articles, and it produces a feed. No coding required, no custom JavaScript routes to maintain.
Deploying RSS-Bridge on TrueNAS
I run RSS-Bridge as a Docker container through Portainer. First, create the config directory and enable all bridges:
bash# Create config directory on ZFS
sudo mkdir -p /mnt/zfs_tank/docker/rss-bridge

# Enable all bridges
sudo tee /mnt/zfs_tank/docker/rss-bridge/config.ini.php << 'EOF'
[system]
enabled_bridges[] = *
EOF
This makes RSS-Bridge available at https://your-machine.tailnet-name.ts.net:3001/ from any device on your tailnet. Use a non-443 port to avoid overwriting your TrueNAS GUI’s Tailscale Serve config.
Tip
When adding feed URLs to FreshRSS, use the local IP (e.g. http://192.168.0.13:3001/...) rather than the Tailscale hostname. Both services run on the same box, so going through the LAN is faster and more reliable — and the FreshRSS container may not have Tailscale DNS available.
Scraping a Site: A Real Example
The Greek tech blog techblog.gr removed its RSS feed during a 2025 site redesign. Here’s how I brought it back.
Step 1 — Identify the selectors
Open the site, right-click an article title, and choose Inspect. On techblog.gr, each article title is an <a> inside an <h3>. On article pages, the content lives inside div.article-content.
Step 2 — Configure CssSelectorBridge
In the RSS-Bridge web UI, find CSS Selector and fill in:
Field
Value
Site URL
https://techblog.gr/
Selector for article links
h3 a
URL pattern
(empty)
Expand article content
.article-content
Content cleanup
(empty)
Title cleanup
| Techblog.gr
Limit
20
Step 3 — Generate and subscribe
Click Generate feed, right-click the Atom button and copy the link. In FreshRSS, go to Subscription management → Add a feed and paste the URL. Done — full article content in your reader, from a site with no RSS feed.
Finding the Right CSS Selectors
For the article link selector: On the homepage, right-click an article title → Inspect. Look at the tag structure. Common patterns are h2 a, h3 a, or .post-title a. If the site uses generic <a> tags everywhere, combine with a URL pattern to filter (e.g. /blog/202 to match only blog post URLs).
For the content selector: Open any individual article, right-click the body text → Inspect. Look at the parent <div> wrapping all the paragraphs. WordPress sites typically use .entry-content or .article-content. Drupal sites often use .field-name-body or .node-content.
Gotcha: Iframes
Some sites (especially job boards) load content inside iframes. RSS-Bridge can only parse the main page HTML — if the content is in an iframe, you’re limited to titles and links. Check your browser’s inspector for <iframe> elements if the content selector doesn’t seem to work.
Setting Sensible Limits
The Limit field controls how many items RSS-Bridge returns per request. Since FreshRSS remembers articles it has already seen, you only need enough to cover new posts between polling intervals:
Feed type
Limit
Reasoning
News sites
20
High frequency, many posts per day
Blogs
10
Weekly or monthly posts
Job boards
10
Few listings, slow turnover
What About Paywalled Sites?
RSS-Bridge has limits. If a site blocks automated requests (returning 403 errors) or loads content via JavaScript that requires authentication, RSS-Bridge can’t help. This applies to most academic journals and some major news outlets.
For journals like NEJM, the publisher’s RSS feed is your only option — and it often contains just titles and volume/page references, no abstracts. A useful workaround for medical journals: use PubMed’s RSS feeds instead. PubMed indexes the same articles and includes full abstracts. Search for a journal, save the search, and create an RSS feed from the results.
Unifying Multiple Feed Readers
If you’re migrating from a desktop reader like Akregator to a self-hosted FreshRSS instance, both support OPML import/export. Export from both, then compare the feed URLs to identify:
Feeds in both — already synced, nothing to do.
Feeds only in the old reader — evaluate whether to add them to FreshRSS or drop them.
Feeds only in FreshRSS — typically your newer RSS-Bridge feeds replacing broken native feeds.
Watch for feeds that exist in both but with different URLs — same source, different CDN, or an old Politepol/feed proxy URL that you’ve since replaced with RSS-Bridge.
Closing Thoughts
This setup takes about 30 minutes to deploy and configure. What you get in return is a single, self-hosted interface for consuming content from any website — with or without their cooperation. No algorithms deciding what you see, no newsletters cluttering your inbox, no tracking pixels following you around.
RSS never died. It just needs a little infrastructure.
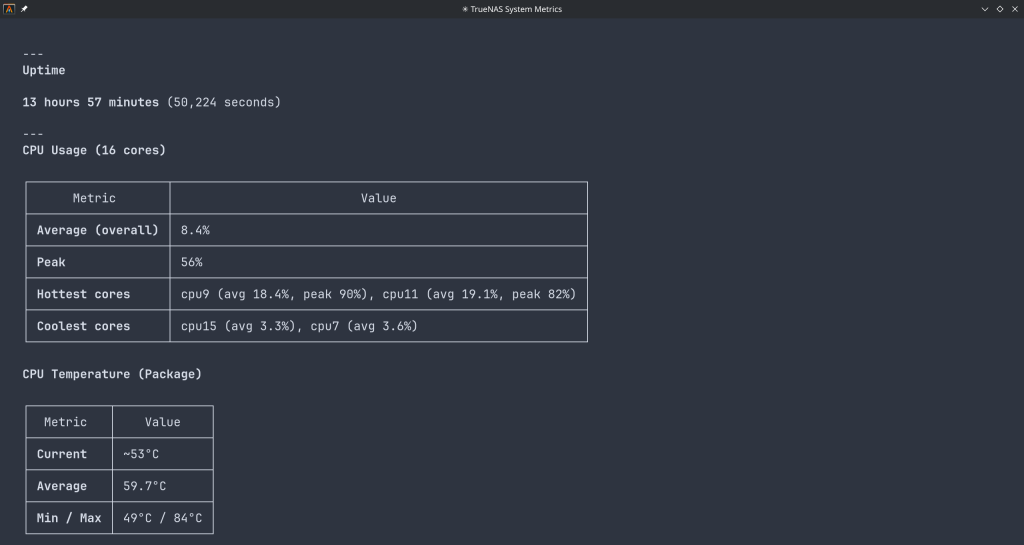
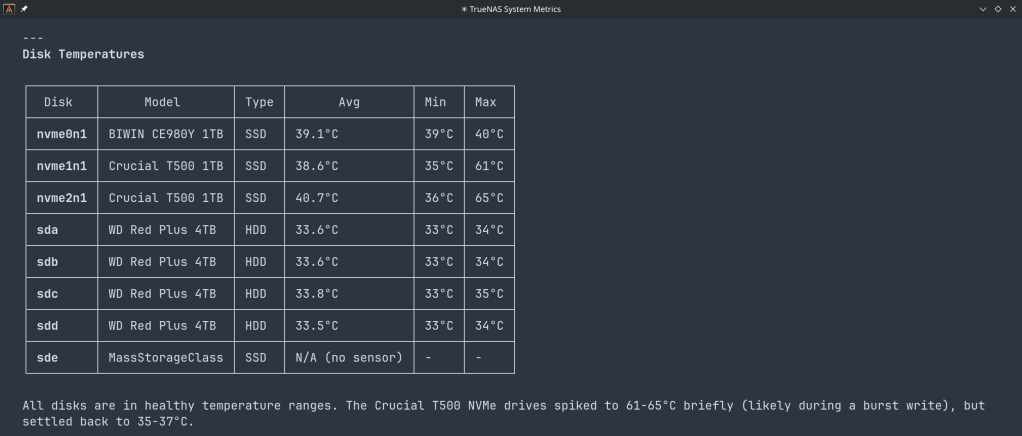
iXsystems lays out its roadmap for the year — an annual release cadence, cloud-style fleet management, and hardware pushing 1 PB per rack unit.
~500K
Systems Deployed
60%+
Fortune 500 Usage
1 PB
NVMe per 1U
📍
Where TrueNAS Stands Today
25.10 “Goldeye” is the recommended version for new deployments, now at GA. 25.04 “Fangtooth” remains best for mission-critical stability. 24.x & 13.0 are end-of-life — no further updates.
🚀
TrueNAS 26 — Annual Releases, No More Fish
A shift to annual releases with simple version numbers (26.1, 26.2…) instead of fish code names. Beta arrives in April 2026 with an extended development cycle for more thorough testing and predictable upgrades.
Unified management for multiple TrueNAS systems, data stays on-prem. Three tiers rolling out through the year:
Foundation (free) — headless setup & config. Plus (Q1, subscription) — replication, Webshare, ransomware protection. Business (Q2) — HA systems, large fleets, MSPs. Early adopters get 50% off the first year.
⚡
Hardware — Terabit Networking & Petabyte Density
The R60 brings 5th-gen hardware with 400GbE and RDMA for AI, video editing, and data science. H-Series hybrid systems mix NVMe and HDDs at 80% lower cost per TB than all-flash.
OpenZFS 2.4 adds intelligent tiering — hot data pinned to flash, cold data on spinning disk. With 122TB SSDs now available, a single 1U can house over 1 PB of NVMe storage.
🎯
The Bottom Line
The theme is clear: own your data. Predictable costs, no vendor lock-in, open-source foundations you can verify. TrueNAS 26 simplifies the release model, Connect simplifies fleet management, and the hardware lineup covers everything from edge deployments to petabyte-scale AI workloads.
Claude Opus 4.6: Anthropic’s Most Capable Model Yet
Published February 6, 2026 — 8 min read
On February 5, 2026, Anthropic released Claude Opus 4.6 — its most powerful AI model to date. Arriving just three months after Opus 4.5, this update delivers a massive expansion to the context window, a new “agent teams” paradigm for parallel task execution, and benchmark scores that surpass both OpenAI’s GPT-5.2 and Google’s Gemini 3 Pro across a range of evaluations.
Whether you’re a developer building agentic workflows, a knowledge worker producing professional documents, or a researcher wrestling with enormous datasets, Opus 4.6 marks a tangible leap in what an AI model can handle in a single session.
1MToken context window (beta)
128KMax output tokens
68.8%ARC AGI 2 score
$5 / $25Input / output per 1M tokens
What’s New in Opus 4.6
While the version bump from 4.5 to 4.6 may seem incremental, the changes under the hood are substantial. Anthropic has focused on three pillars: reasoning depth, context capacity, and agentic execution.
⚡
1 Million Token Context Window A 5× increase over the previous 200K limit. Opus 4.6 scores 76% on the MRCR v2 needle-in-a-haystack benchmark at 1M tokens, compared to just 18.5% for Sonnet 4.5 — a qualitative shift in usable context.
🤖
Agent Teams in Claude Code Multiple specialised agents can now split a task and work in parallel — one on the frontend, one on the API, one on a migration — coordinating autonomously. Anthropic reports a roughly 30% reduction in end-to-end task runtime.
🧠
Adaptive Thinking Replaces the binary on/off extended thinking toggle. Opus 4.6 dynamically decides how much reasoning effort a prompt requires. Four effort levels (low, medium, high, max) give developers fine-grained cost–speed–quality control.
♾️
Context Compaction API A new beta feature that automatically summarises older context as conversations grow, enabling effectively infinite sessions without manual truncation or sliding-window hacks.
📊
Claude in PowerPoint & Excel Updates Claude now operates as a side panel inside PowerPoint, respecting your slide masters and layouts. Excel gets unstructured data support and longer workflows for paid subscribers.
Benchmark Breakdown
Opus 4.6 sets new state-of-the-art scores on several major evaluations. The most striking result is on ARC AGI 2, a benchmark designed to measure novel problem-solving that is easy for humans but notoriously hard for AI. Opus 4.6 scored 68.8% — nearly double Opus 4.5’s 37.6% and well ahead of GPT-5.2 (54.2%) and Gemini 3 Pro (45.1%).
Benchmark
Opus 4.6
Opus 4.5
GPT-5.2
Gemini 3 Pro
Terminal Bench 2.0
65.4%
59.8%
—
—
OSWorld (Agentic)
72.7%
66.3%
< 72.7%
< 72.7%
ARC AGI 2
68.8%
37.6%
54.2%
45.1%
MRCR v2 (1M ctx)
76%
—
—
—
Humanity’s Last Exam
#1
—
—
—
Beyond the headline numbers, Opus 4.6 also tops the GDPval-AA benchmark for economically valuable knowledge work, outperforming GPT-5.2 by approximately 144 ELO points. In life sciences, it delivers nearly twice the performance of its predecessor on computational biology, structural biology, organic chemistry, and phylogenetics tests.
Coding and Developer Impact
Coding has always been a strength of the Opus line, and 4.6 takes it further. The model plans more carefully before generating code, catches its own mistakes through improved self-review, and sustains agentic tasks for longer without losing coherence. For large codebases, Anthropic claims it can now handle autonomous code review, debugging, and refactoring across repositories that would have previously required human intervention.
“Opus 4.6 is a model that makes the shift from chatbot to genuine work partner really concrete for our users.”
— Scott White, Head of Product, Anthropic
The new agent teams feature in Claude Code is particularly noteworthy. Rather than a single agent working sequentially, developers can now spin up parallel agents that own distinct parts of a task. Anthropic’s example: one agent handles the frontend, another the API layer, and a third manages database migrations — all coordinating autonomously. This is available as a research preview and represents a meaningful step towards multi-agent orchestration out of the box.
Enterprise and Knowledge Work
Anthropic has been explicit about targeting enterprise workflows with this release. Roughly 80% of the company’s business comes from enterprise customers, and Opus 4.6 is tuned for the kind of work they care about: financial analysis, legal research, document production, and multi-step research tasks.
The model now leads on the Finance Agent benchmark and TaxEval by Vals AI. Combined with the expanded context window, analysts can feed entire filings, market reports, and internal data into a single session and get coherent, cross-referenced outputs. Anthropic says Opus 4.6 produces documents, spreadsheets, and presentations that approach expert-created quality on the first pass, reducing the rework cycle significantly.
💡 Pricing NoteStandard API pricing remains at $5 input / $25 output per million tokens — identical to Opus 4.5. Requests exceeding 200K input tokens are charged at a premium rate of $10 / $37.50 per MTok. The model is available via the Anthropic API, AWS Bedrock, Google Vertex AI, Microsoft Foundry, and directly on claude.ai.
Availability and API Changes
Opus 4.6 is live now across all major platforms. The API model identifier is simply claude-opus-4-6 — note the simplified naming without a date suffix. It’s available on the Anthropic API, AWS Bedrock, Google Vertex AI, Microsoft Foundry, and through GitHub Copilot for Pro, Pro+, Business, and Enterprise users.
Developers should be aware of a few breaking changes: assistant message prefilling now returns a 400 error (migrate to structured outputs or system prompt instructions), the output_format parameter has moved to output_config.format, and the effort parameter is now generally available without a beta header.
Safety and Alignment
Anthropic reports that the intelligence gains in Opus 4.6 have not come at the cost of safety. On their automated behavioural audit, the model showed low rates of misaligned behaviours including deception, sycophancy, and encouragement of user delusions — matching Opus 4.5’s results. Six new cybersecurity probes have been added to evaluate potential misuse vectors, and the model achieves a lower rate of unnecessary refusals compared to previous releases.
The Bigger Picture
Opus 4.6 arrives at a moment of intensifying competition. OpenAI announced its new OpenAI Frontier enterprise platform just hours before Anthropic’s launch, signalling a strategic pivot towards infrastructure and agent management rather than competing purely on benchmark scores. Google’s Gemini 3 Pro and Microsoft’s deep integration of Opus 4.6 into Foundry add further complexity to the landscape.
What sets this release apart is the combination of raw capability and practical utility. The 1M context window, agent teams, adaptive thinking, and context compaction aren’t just benchmark optimisations — they address real friction points that developers and knowledge workers hit daily. If Opus 4.5 moved Claude from “chatbot” to “useful tool,” Opus 4.6 positions it as a genuine work partner that can own entire workflows end-to-end.
For those already running Opus 4.5 in production, the upgrade path is a single API version change at the same price point. For everyone else, this is a strong argument to take a serious look at what Claude can do in 2026.
After years of using Anki for medical school, I finally got tired of relying on AnkiWeb for syncing. Privacy concerns, sync limits, and the occasional downtime pushed me to self-host. The problem? The official Anki project provides source code but no pre-built Docker image. Building from source every time there’s an update? No thanks.
So I built Anki Sync Server Enhanced — a production-ready Docker image with all the features self-hosters actually need.
Why Self-Host Your Anki Sync?
Privacy — Your flashcards stay on your server
No limits — Sync as much as you want
Speed — Local network sync is instant
Control — Backups, monitoring, your rules
What Makes This Image Different?
I looked at existing solutions and found them lacking. Most require you to build from source or offer minimal features. Here’s what this image provides out of the box:
Feature
Build from Source
This Image
Pre-built Docker image
No
Yes
Auto-updates
Manual
Daily builds via GitHub Actions
Multi-architecture
Manual setup
amd64 + arm64
Automated backups
No
Yes, with retention policy
S3 backup upload
No
Yes (AWS, MinIO, Garage)
Prometheus metrics
No
Yes
Web dashboard
No
Yes
Notifications
No
Discord, Telegram, Slack, Email
Quick Start
Getting started takes less than a minute:
docker run -d \
--name anki-sync \
-p 8080:8080 \
-e SYNC_USER1=myuser:mypassword \
-v anki_data:/data \
chrislongros/anki-sync-server-enhanced
That’s it. Your sync server is running.
Docker Compose (Recommended)
For a more complete setup with backups and monitoring:
If you’re using Anki seriously — for medical school, language learning, or any knowledge work — self-hosting your sync server gives you complete control over your data. This image makes it as simple as a single Docker command.
Questions or feature requests? Open an issue on GitHub or leave a comment below.
Immich, the popular open-source, self-hosted photo and video management solution, has launched a community-driven initiative to improve its metadata handling capabilities. Through the new EXIF Dataset project, users can contribute their photos to help train and improve Immich’s EXIF parsing and metadata extraction features.
I recently contributed some of my own photos to the project, and I want to share how easy and straightforward the process is. If you’re an Immich user (or simply an open-source enthusiast), this is a fantastic way to give back to the community.
What is the EXIF Dataset Project?
EXIF (Exchangeable Image File Format) data is the metadata embedded in your photos by your camera or smartphone. This includes information like the camera make and model, date and time, GPS coordinates, lens information, and much more. Immich uses this data extensively to organize your photo library, enable timeline views, power location-based features, and facilitate powerful search capabilities.
The EXIF Dataset project at datasets.immich.app/projects/exif allows community members to contribute photos along with their intact EXIF metadata. This crowdsourced dataset helps the Immich team understand how different cameras and devices encode their metadata, ultimately improving compatibility and parsing accuracy for everyone.
The contribution process is remarkably simple and well-designed. Here’s how it works:
Step 1: Upload Your Photos
After navigating to the EXIF Dataset project page, you’re greeted with a clean upload interface. I uploaded a couple of photos taken with my Samsung Galaxy A55 5G – a beach landscape shot and a photo from a beachside restaurant.
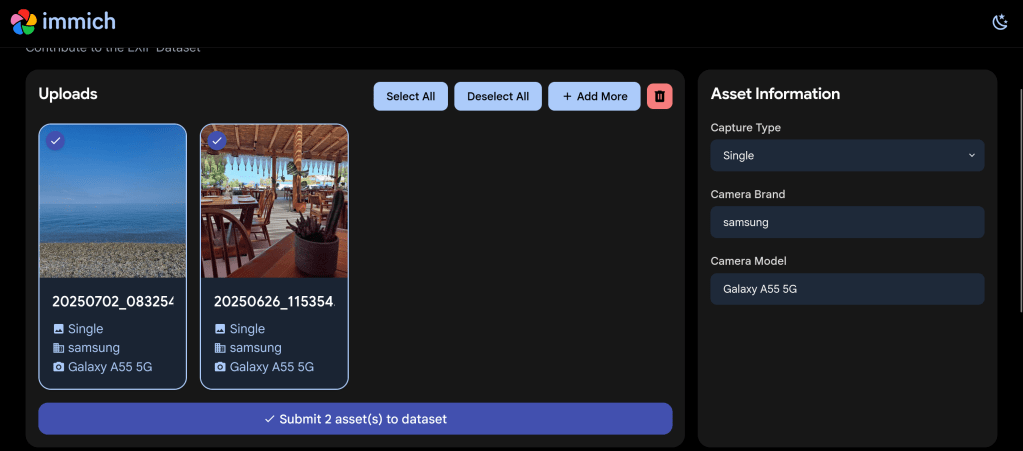
The clean upload interface showing my first selected photo with its EXIF metadata displayed
The interface immediately displays the extracted EXIF information on the right side, including the capture type (Single), camera brand (Samsung), and camera model (Galaxy A55 5G). This lets you verify that your photos contain the metadata you want to contribute.
Step 2: Select Photos for Submission
You can upload multiple photos at once using the “+ Add More” button. I selected both of my photos for contribution – each showing clearly with a checkmark indicating selection.
Two photos selected and ready to submit to the EXIF Dataset
The interface provides convenient “Select All” and “Deselect All” buttons, as well as a delete option if you change your mind about any uploads.
Step 3: Agree to the CC0 License
When you click “Submit asset(s) to dataset”, a Dataset Agreement dialog appears. This is where the legal side of your contribution is handled transparently.
The Dataset Agreement confirms your photos will be released under the CC0 public domain license
ℹ️ About CC0: The CC0 (Creative Commons Zero) license means you’re releasing your contributed photos into the public domain. This allows the Immich project (and anyone else) to use the images freely for any purpose. Make sure you only upload photos you own the rights to and are comfortable sharing publicly.
The agreement requires you to confirm two things:
You agree to release the uploaded assets under the CC0 license into the public domain
The files have not been modified in any way that would alter their original content or metadata
You also provide a contact email in case the Immich team has any questions about your upload.
Why Should You Contribute?
Contributing to the EXIF Dataset helps improve Immich in several ways:
Better Device Support: By collecting EXIF samples from many different cameras and phones, Immich can improve its parsing for devices that may have quirks or non-standard metadata encoding
Improved Metadata Extraction: The dataset helps identify edge cases and unusual metadata formats that might otherwise go unnoticed
Community-Driven Development: Your contribution directly influences the quality of an open-source project used by thousands of self-hosters worldwide
Supporting Privacy-Focused Software: Immich is a privacy-respecting alternative to cloud-based photo services like Google Photos – your contribution helps make it even better
Tips for Contributing
To make your contribution as valuable as possible:
Contribute from different devices: If you have photos from older cameras, different smartphone brands, or professional equipment, these are especially valuable
Keep metadata intact: Don’t strip or modify the EXIF data before uploading – the original metadata is exactly what’s needed
Consider variety: Photos taken in different conditions (indoor, outdoor, various lighting) may contain different metadata values
Check your ownership: Only contribute photos you’ve taken yourself or have explicit rights to share
About Immich
For those unfamiliar with Immich, it’s a high-performance, self-hosted photo and video management solution that offers features comparable to Google Photos – but with full control over your data. Key features include automatic backup from mobile devices, facial recognition, smart search, timeline views, shared albums, and much more.
Immich is developed under the AGPL-3.0 license and is backed by FUTO, an organization dedicated to developing privacy-preserving technology. The project has grown tremendously, with over 77,000 stars on GitHub, making it one of the most popular self-hosted applications available.
🏠 Self-Host Immich: Get started with Immich at immich.app – available for Docker, TrueNAS, Unraid, and other platforms.
Conclusion
Contributing to the Immich EXIF Dataset is a simple yet meaningful way to support open-source software development. The process takes just a few minutes, and your contribution will help improve photo management for the entire Immich community.
GitHub has officially rolled out the improved “Files Changed” experience as the default for all users. After months in public preview, this redesigned pull request review interface brings significant improvements to performance, accessibility, and overall productivity when reviewing code changes.
Key Improvements Over the Classic Experience
The new interface maintains familiarity for existing users while adding several notable enhancements:
Comment on Any Line
Previously, you could only comment on lines directly surrounding a change. Now you can add review comments to any line in a changed file, making it easier to provide context or point out related code that might need attention.
View PR Description Without Switching Pages
A new Overview panel lets you view the pull request description directly from the “Files changed” page. No more jumping back and forth between tabs to remember what the PR is supposed to accomplish.
Enhanced File Tree
The file tree sidebar is now resizable and includes visual indicators showing which files have comments, errors, or warnings. This makes it much easier to track your progress when reviewing large PRs with many changed files.
Draft Comments That Persist
Comments and replies are now saved locally in your browser. If you accidentally close the tab or refresh the page, your in-progress feedback won’t be lost.
Fewer Page Reloads
Actions like refreshing to pull in new changes, switching between split and unified diff modes, and other common tasks no longer force a full page reload. The interface feels much snappier as a result.
Improved Accessibility
The new experience includes better keyboard navigation, screen reader landmarks, and increased line spacing options to make code review accessible to everyone.
Experimental Mode for Large Pull Requests
One of the most interesting additions is an experimental mode specifically designed for reviewing large pull requests. This mode uses virtualization to reduce the number of DOM elements the browser needs to manage, significantly improving memory usage and page responsiveness—especially on slower machines.
When viewing a large PR, you’ll see a banner offering to try this experimental mode. There are some trade-offs: browser find functionality, text selection across the entire page, printing, and some browser extensions may not work as expected since the full diff isn’t rendered in the DOM. You can switch back to single file mode at any time.
Bug Fixes and Polish
GitHub has also addressed numerous issues including problems with suggested changes being applied incorrectly, comment workflow bugs, interaction lag (especially on Safari), and various UI quirks like scroll positioning and sticky headers behaving unexpectedly.
Opting Out
If you prefer the classic experience, you can still opt out through your settings. However, given the improvements in this new version, it’s worth giving it a fair trial before switching back.
Providing Feedback
GitHub is actively collecting feedback on the new experience. If you encounter issues or have suggestions, you can participate in the “Files Changed” preview feedback discussion on GitHub.
Happy New Year, self-hosters! The Immich team has kicked off 2026 with a bang, releasing version 2.5.0 – aptly named the “90,000 Stars Release” in celebration of reaching this impressive GitHub milestone. This release is packed with long-awaited features that significantly improve both the mobile and web experience. Let’s dive into what’s new.
Free Up Space: Finally Here
This feature has been one of the most requested since the early days of Immich (it has a 3-digit issue ID!). Free Up Space allows you to remove local media files from your mobile device that have already been successfully backed up to your Immich server.
Free Up Space accessible from the user profile panelConfiguration options for Free Up Space
The feature includes smart configuration options:
Cutoff date: Only process photos and videos on or before a specified date
Keep albums: Preserve specific albums (WhatsApp-related albums are kept by default)
Keep favorites: Favorited assets stay on your device
Keep on device: Option to always keep all photos or all videos
Before any files are removed, you’ll see a review screen showing exactly what will be deleted and how much storage you’ll reclaim. Deleted items go to your device’s native Trash, giving you a safety net.
Non-Destructive Photo Editing
Immich now supports non-destructive editing – a major enhancement for anyone who’s hesitated to edit photos for fear of losing the original. Edits are stored in the database while original files remain untouched. You can always revert to the original.
Click the edit icon to enter edit mode
Currently supported editing operations:
Cropping
Rotation
Mirroring
The editing interface with cropping, rotation, and mirroring toolsOpening the editor on an edited asset loads existing edits for adjustment
When downloading an edited asset, you get the edited version by default, but can also choose to download the original. Note that mobile editing still uses the old system for now – the non-destructive approach will come to mobile in a future release.
Web-Based Database Backup and Restore
Database management just got significantly easier. Previously, restoring an Immich instance required command-line access – a barrier for users new to self-hosting. Now, the entire backup and restore pipeline is built into the web UI.
You can restore from two locations:
Restore from the Administration → Maintenance pageRestore from the Onboarding page on a fresh installation
This is particularly valuable if you’ve ever worried about database corruption from power loss or system failures.
Upload Improvements
Foreground uploads on mobile have been significantly improved. The new implementation brings back reliable upload handling while adding concurrent uploads and proper support for assets with missing file extensions (common with DJI and Fusion Camera files).
Improved upload interface with concurrent upload support
A notable improvement for iOS/iCloud users: uploads now send unique metadata to the server for faster checksum retrieval when reinstalling the app. To take advantage of this for existing uploads, go to App Settings → Sync Status and tap “Sync Cloud IDs” once.
Sync Cloud IDs to backfill metadata for existing uploads (iOS/iCloud users)
Visual Refresh
The entire Immich experience has received a visual update across web, mobile, and documentation. A new font improves readability, especially for numbers and smaller text.
Refreshed visual design with improved typography
The UI library has been integrated more deeply into the web app, providing more consistent components and better visual hierarchy.
More standardized and coherent UI components
All icon buttons now include tooltips – no more guessing what a button does.
All icon buttons now show helpful tooltips
Additional Highlights
Star Rating on Mobile
Mobile users can now rate their photos with stars, bringing feature parity with the web application.
Star rating now available on mobile
Disable Admin Setup
New environment variable IMMICH_ALLOW_SETUP=true|false lets you prevent the admin setup page from appearing after initial configuration – useful if your database ever gets accidentally reset.
Fine-Grained API Permissions
New scoped permissions for API keys include: map.read, map.search, and folder.read.
Progressive JPEGs
Image generation settings now include an option for progressive JPEGs, allowing supported browsers to render images progressively as they load.
New progressive JPEG option in image generation settings
Slideshow Loop
Web slideshows can now automatically restart when they reach the end.
New loop option in slideshow settings
Native HTTP Clients
All remote images now use optimized HTTP clients supporting HTTP/2 and HTTP/3. Images load faster, caching is improved, and the offline experience is more responsive with a larger cache size.
Important Notes
Mobile App Update Paused: As of the release, the team has temporarily halted the mobile app release due to some reported migration issues. Check the GitHub release page for the latest status.
Client Compatibility: Mobile clients must be updated to v2.5.0 to view edited versions of assets. Older clients will continue to see original images.
How to Update
Follow the standard update procedure for your deployment method. As always, ensure you have a backup before upgrading.
For the complete changelog including all bug fixes and documentation updates, check the full release notes on GitHub.
Support the Project
If you find Immich helpful, consider supporting the project by purchasing a product key at buy.immich.app or grabbing some merchandise at immich.store.
Unlock insights from your spaced repetition learning journey
If you’re serious about learning, chances are you’ve encountered Anki—the powerful, open-source flashcard application that uses spaced repetition to help you remember anything. Whether you’re studying medicine, languages, programming, or any other subject, Anki has likely become an indispensable part of your learning toolkit.
But have you ever wondered what stories your flashcard data could tell? How your review patterns have evolved over time? Which decks demand the most cognitive effort? That’s exactly why I created ankiR.
What is ankiR?
ankiR is an R package that lets you read, analyze, and visualize your Anki collection data directly in R. Under the hood, Anki stores all your notes, cards, review history, and settings in a SQLite database. ankiR provides a clean, user-friendly interface to access this treasure trove of learning data.
Installation
ankiR is available on CRAN and R-universe, making installation straightforward:
Bug reports: Feel free to open issues on the package repository
Related Projects
If you’re interested in spaced repetition and R, you might also want to check out:
FSRS: The Free Spaced Repetition Scheduler algorithm, which Anki now supports natively
anki-snapshot: Git-based version control for Anki collections
Conclusion
Your Anki reviews represent countless hours of deliberate practice. With ankiR, you can finally extract meaningful insights from that data. Whether you’re a medical student tracking board exam prep, a language learner monitoring vocabulary acquisition, or a researcher studying memory, ankiR gives you the tools to understand your learning at a deeper level.
Give it a try, and let me know what insights you discover in your own data!
ankiR is open source and contributions are welcome. Happy learning!
As someone who uses Anki extensively for medical studies, I’ve always been fascinated by the algorithms that power spaced repetition. When the FSRS (Free Spaced Repetition Scheduler) algorithm emerged as a more accurate alternative to Anki’s traditional SM-2, I wanted to bring its power to the R ecosystem for research and analysis.
The result is rfsrs — R bindings for the fsrs-rs Rust library, now available on r-universe.
Install it now: install.packages("rfsrs", repos = "https://chrislongros.r-universe.dev")
What is FSRS?
FSRS is a modern spaced repetition algorithm developed by Jarrett Ye that models memory more accurately than traditional algorithms. It’s based on the DSR (Difficulty, Stability, Retrievability) model of memory:
Stability — How long a memory will last (in days) before dropping to 90% retrievability
Difficulty — How hard the material is to learn (affects stability growth)
Retrievability — The probability of recalling the memory at any given time
FSRS-6, the latest version, uses 21 optimizable parameters that can be trained on your personal review history to predict optimal review intervals with remarkable accuracy.
The Rating Scale
FSRS uses a simple 4-point rating scale after each review:
1
Again
Blackout
2
Hard
Struggled
3
Good
Correct
4
Easy
Effortless
Why Rust + R?
The reference implementation of FSRS is written in Rust (fsrs-rs), which provides excellent performance and memory safety. Rather than rewriting the algorithm in R, I used rextendr to create native R bindings to the Rust library.
This approach offers several advantages:
Performance — Native Rust speed for computationally intensive operations
Correctness — Uses the official, well-tested implementation
Maintainability — Updates to fsrs-rs can be easily incorporated
Type Safety — Rust’s compiler catches errors at build time
library(rfsrs)

# Get the 21 default FSRS-6 parameters
params <- fsrs_default_parameters()

# Create initial memory state (rating: Good)
state <- fsrs_initial_state(rating = 3)
# $stability: 2.3065
# $difficulty: 2.118104
Tracking Memory Decay
# How well will you remember?
for (days in c(1, 7, 30, 90)) {
  r <- fsrs_retrievability(state$stability, days)
  cat(sprintf("Day %2d: %.1f%%\n", days, r * 100))
}
# Day  1: 95.3%
# Day  7: 76.4%
# Day 30: 49.7%
# Day 90: 26.5%
Note: Stability of 2.3 days means memory drops to 90% retrievability after 2.3 days. This increases with each successful review.
Use Cases for R
Research — Analyze spaced repetition data with R’s statistical tools
Visualization — Plot memory decay curves with ggplot2
Integration with ankiR — Combine with ankiR to analyze your Anki collection
Custom schedulers — Build spaced repetition apps in R/Shiny
Building Rust + R Packages
The rextendr workflow:
Create package with usethis::create_package()
Run rextendr::use_extendr()
Write Rust with #[extendr] macros
Run rextendr::document()
Build and check
Windows builds: Cross-compiling Rust for Windows can be tricky. My r-universe builds work on Linux and macOS but fail on Windows. Windows users can install from source with Rust installed.